Showing posts with label css. Show all posts

Sunday, 22 December 2013

How to Use Character Entities in CSS, HTML and JavaScript

Sometimes, when using scripts, we must write special characters like accents by using a special set of codes called character entities, however these don't always look good or we get a question mark or other strange symbols. Usually, this is solved if the character encoding is done right but the logic may not always work.

In Blogger, special characters most of the time appear correctly, but when it is about other services, like external files, things can get complicated.

For example, this usually looks good and when you click on this link, you should see the letters in the right way:
alert(" á é í ó ú  ☺ ✛ ❤ ");
If we are trying to use other method and we want to use this type of characters, sometimes we need to write them in a special format called escape sequence which is nothing but a backslash followed by a letter and a number in hexadecimal format. In the case of common characters or accents, it would be \x followed by two hex digits:
\xe1 is the letter á
\xe9 is the letter é
\xed is the letter í
\xf3 is the letter ó
\xfa is the letter ú
Other combinations generate special characters:
\n is a line break
\t is the tab character
\' is single quote
\" is double quote
\\ is a back slash
Or we can use \u followed by the Unicode character code expressed as four hexadecimal digits:
\u00e1 is the letter á
\u00e9 is the letter é
\u00ed is the letter í
\u00f3 is the letter ó
\u00fa is the letter ú
this will allow us to see correctly what we couldn't before if we were using some other services:
alert(" \u263a \u2764 \u271b ");
On this page you can find a comprehensive list of all the characters, both symbols and different alphabets.

Although rare characters are not often used in the CSS, there is a case when they are necessary as well, like when using the content property with the :after and :before pseudo-elements.

The same criteria applies there, but we only need to add a backslash followed by the four-digit hexadecimal code. For example:
content: ":\24d1\24d4\24d5\24de\24e1\24d4";

content: ":after  \263a  \2724  \2602";
:ⓑⓔⓕⓞⓡⓔ
:after ☺ ✤ ☂

Remember that IE doesn't understand the :before pseudoclass with content, and you would have to set the list-style-type property as none, or you would get 2 bullets in CSS compliant browsers.
Read more ...


Tuesday, 17 December 2013

How To Add Snow In The Background of Your Blog Using CSS

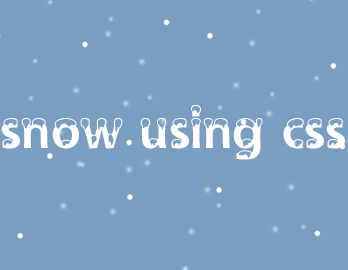
falling snow, snow, winter background, bloggerToday we’re going to go over a super simple CSS technique that you can use to make it snow on your Blogger blog. It seems particularly attractive since it doesn't require scripts, only CSS and three small images.

An advantage of this method is that by not using scripts doesn't overload the blog, the disadvantage is that users with not so modern browsers, will not be able to see it (in Internet Explorer works for version 10 and up).

The snow will fall in the background of the blog, which, in addition, prevent interfering with links or content (because the flakes are images), also prevent blocking the visibility of the content of the blog.

You can see the demo in this test blog.

How To Add Falling Snow To Blogger Blogspot


Step 1. Go to Template and click on the Edit HTML button:


Step 2. Click the small arrow on the left of <b:skin>...</b:skin> to expand the style (screenshot 1) and click anywhere inside the code area to search by using the CTRL + F keys for the ]]></b:skin> tag (screenshot 2)

Step 3. Add the following code just above it:
/* Snow falling for Blogger
----------------------------------------------- */
@keyframes snow {
0% {background-position: 0px 0px, 0px 0px, 0px 0px;}
100% {background-position: 500px 1000px, 400px 400px, 300px 300px;}
}

@-moz-keyframes snow {
0% {background-position: 0px 0px, 0px 0px, 0px 0px;}
100% {background-position: 500px 1000px, 400px 400px, 300px 300px;}
}

@-webkit-keyframes snow {
0% {background-position: 0px 0px, 0px 0px, 0px 0px;}
100% {background-position: 500px 1000px, 400px 400px, 300px 300px;}
}

@-ms-keyframes snow {
0% {background-position: 0px 0px, 0px 0px, 0px 0px;}
100% {background-position: 500px 1000px, 400px 400px, 300px 300px;}
}

#falling-snow {
background-image: url(https://blogger.googleusercontent.com/img/b/R29vZ2xl/AVvXsEglccati7AUTu_8YmxQDAjJ39vucPa1PD7I8cG3curSoVL0RB8Ec3KfYDI_QqN2lnGV1-1aJlVIbt_YhxsZyr0OX0bAflQRgNw3a0qciHXytmTgzKz-3w63tdcXJhZj42AnEnCCC-vC5MNY/s1600/snow.png), url(https://blogger.googleusercontent.com/img/b/R29vZ2xl/AVvXsEiBP3-KP8x33KQuBkxDEOQLZI6lziy8qkk9E6yBDQau0Gx0WGEYBQEdD5Nd9SlKCPnY7LtQtMjq2NBSxkM6ewk35fArttINLi3QZ2UHcoeIS_HVPvuOiVSs0O-GVfan4oisRc4_Z5I5Nfji/s1600/snow3.png), url(https://blogger.googleusercontent.com/img/b/R29vZ2xl/AVvXsEica4B_JTA0a_0MB8MaGbXQlWpFHCWIcvB2FkVHAaBaINaRie5qy7g7SGvwr03PhalD6xPKD4f-WCUeZ4keqo0DQchQIvb98H76tMjk1VEPtrH179kM7nKSsx8sqeuCS6Yf43AWsSeK_IPs/s1600/snow2.png);
-webkit-animation: snow 20s linear infinite;
-moz-animation: snow 20s linear infinite;
-ms-animation: snow 20s linear infinite;
animation: snow 20s linear infinite;
}
Screenshot 1: 


Screenshot 2:


Step 3. Now, search (CTRL + F) the <body> tag or if you can't find it, search this line below:
<body expr:class='&quot;loading&quot; + data:blog.mobileClass'>
Step 4. And just below, add this:
<div id='falling-snow'>
Step 5. Finally, find the </body> tag (CTRL + F) and add the following just above it:
</div>
Step 6. Save the changes and that's it. Enjoy!!! :)

As you can see this tricks is very simple and easy to install, does not block the visibility of blog's content and most important, it has no scripts, only CSS and nothing else.
Read more ...


Monday, 28 October 2013

How to Add a Tiny jQuery Circleslider to Blogger

Tiny Circleslider is a small jQuery plugin generating a circular carousel of images that we can slide infinitely (circular). When clicking on the red dot, the main picture moves to the left and another set of images will slide out. There is noting complicated about using this type of carousel, however when it's about customizing it, it's necessary to use a bit of arithmetic. All these details can be found in the author's homepage, so I'll just limit myself to show you the basics.

Demo

Click on the red dot, then move it along the circle:
jquery slider, image slider for blogger


Adding the Tiny Circleslider to the Blog


In order to make it work, first task is to add the javascript jQuery library in our template:

Step 1. From your Blogger's dashboard, select your blog

Step 2. Go to Template and click the Edit HTML button:


Step 3. Click anywhere on the code area and search by using the CTRL + F keys for this tag:
</head>
Step 4. Just above the </head> tag, add the following scripts:
<script src='http://ajax.googleapis.com/ajax/libs/jquery/1.10.2/jquery.min.js' type='text/javascript'/>
<script src="http://helplogger.googlecode.com/svn/trunk/jquery.tinycircleslider.min.js"/>
Step 5. We need to add the CSS styles above the </head> tag, as well:
<style>
  #rotatescroll { /* is the rectangle container */
    height: 300px;
    position: relative;
    width: 300px;
  }
  #rotatescroll .viewport { /* is the rectangle containing the images */
    height: 300px;
    position: relative;
    margin: 0 auto;
    overflow: hidden;
    width: 300px
  }
  #rotatescroll .overview { /* is the list with the images */
    left: 0;
    list-style: none;
    margin: 0;
    padding: 0;
    position: absolute;
    top: 0;
  }
  #rotatescroll .overview li { /* each item of the list */
    float: left;
    height: 300px;
    position: relative;
    width: 300px;
  }
  #rotatescroll .overlay { /* the image with the circle overlapping the list */
    background: transparent url(https://blogger.googleusercontent.com/img/b/R29vZ2xl/AVvXsEiXfF_WK2F3F7oLdF5UnV_ZTsvOCs_DDxtkZ1WKpOY4SB0RXK1TQzCC7NpGM86RbOYQyvvhyu8AmS8gz6jp_Sz2ckKoAsL78Dtwr2x7ihqRH5_5M3EwfHxacT0fbpgEg_b06VjDoNZ51CBA/s1600/bg-rotatescroll.png) no-repeat 0 0;
    height: 300px;
    left: 0;
    position: absolute;
    top: 0;
    width:300px;
  }
  #rotatescroll .thumb { /* the red circle that allows us to navigate */
    background:transparent url(https://blogger.googleusercontent.com/img/b/R29vZ2xl/AVvXsEjuTap5W4F6DjnGMhkCuW140bjult30MDN26ghX20D6MTnq7dABm0bejgx00LmVMhfiU5fA_Oo_mqq5BVksICA4BEFKK9N0MI1j6M_1kfr6rZQeG1qNd0imY7pZXqpv0U2dBNPFgPAyAHCF/s1600/bg-thumb.png) no-repeat 0 0;
    cursor: pointer;
    height: 26px;
    left: 137px;
    position: absolute;
    top: -3px;
    width: 26px;
    z-index: 200;
  }
  #rotatescroll .dot { /* the points indicating the position of each image */
    background: transparent url(https://blogger.googleusercontent.com/img/b/R29vZ2xl/AVvXsEiwV5HEdVW0TI6uB_vuNfhYr3lVmfurUo0LLYNiot7DWzqGBZ0RbN5Q-nRxDPPjlI_zmRUuRlAm1qDY70PIJuOWL6HmA8aRtQManuBOdWQ52rGeqXtUF5gTnucPQmzndVnONm9rwBLYbGF1/s1600/bg-dot.png) no-repeat 0 0;
    display: none;
    height: 12px;
    left: 155px;
    position: absolute;
    top: 3px;
    width: 12px;
    z-index: 100;
  }
  #rotatescroll .dot span { /* are hidden by default */
    display: none;
  }
</style>
Screenshot
Step 6. Save the changes by clicking the Save Template button

Now here's the HTML that has to be added to where we want to display the carousel.
To add it inside a post the click the New post on the left side of your dashboard and paste the code below by going to the HTML tab:
<div id="rotatescroll">
  <div class="viewport">
    <ul class="overview">
      <li><img src="imageURL" /></li>
      <li><img src="imageURL" /></li>
      <li><img src="imageURL" /></li>
      <li><img src="imageURL" /></li>
      <li><img src="imageURL" /></li>
    </ul>
  </div>
  <div class="dot"></div>
  <div class="overlay"></div>
  <div class="thumb"></div>
</div>

<script type="text/javascript">
$(document).ready(function(){ $('#rotatescroll').tinycircleslider(); });
$('#rotatescroll').tinycircleslider({ interval: true, snaptodots: true });
</script>
blogger template
Screenshot

Note: replace the imageURL text with the URL of your images

and here are other options that could be added, separated by commas:

snaptodots - false if you want no dots to be shown when dragging them
hidedots - false if you want to display the internal points (by default is true)
intervaltime - is the time between slides (by default 3500)
radius - defines the size of the circle (by default is 140)

If you want to add it to your sidebar, simply go to Layout, click the Add a Gadget link > from the popup window, choose HTML/Javascript and paste the code inside the empty box.
Read more ...


Thursday, 24 October 2013

Add Keyboard Keys Effect To Your Text in Blogger with CSS

For many of us the design and the template are the most important, making our readers be more interested and coming back to our blog. There's an HTML element meant for marking up keyboard keys named <kbd> which can be styled with CSS, so why not use it to make those elements look the keyboard keys?

Thus, in this tutorial, I am going to show you how to create a keyboard keys effect with CSS. It doesn't require images so your blog will load faster.

how to add keyboard keys with css in blogger

How to Add Keyboard Keys to Blogger


Step 1. From Blogger Dashboard, select your blog and go to Template > Edit HTML

edit the html of blogger template

Step 2. Click anywhere inside the code area, press the Ctrl + F keys and search for this piece of code:
]]></b:skin>
Screenshot
Click on the arrow to expand the code

Step 3: Just above ]]></b:skin> paste this CSS style:
kbd{
border:1px solid gray;
font-size:1.2em;
box-shadow:1px 0 1px 0 #eee, 0 2px 0 2px #ccc, 0 2px 0 3px #444;
-webkit-border-radius:3px;
-moz-border-radius:3px;
border-radius:3px;
margin:2px 3px;
padding:1px 5px;
}
Step 4. To save the changes, press the Save change button.

Finally, we need to add the html <kbd> tags to the text on which we want to apply the keyboard keys style.

From your blogger's dashboard, go to create a New Post, write the text on which you want to apply the style and go to the HTML tab. Before and after the text, add the following HTML tags:
<kbd>Ctrl</kbd> + <kbd>F</kbd>

Screenshot
text with keyboard key effect

This will make it to look like this:

Ctrl + F
Read more ...


Wednesday, 18 September 2013

Rounded Corners and Shadows for Images using CSS

Here are some unique border styles that you can apply to blogger images by using the border-radius property and defining either all four corners simultaneously or applying the rounded border only to some of them.

One of the advantages of CSS3 is that we can apply rounded borders without complicating things too much and one of the options would be to use these edges or borders to images in the blog posts, to which we can also add some hover effects such as shading and rounded borders accompanied by transitions.

Note: if you need more info about how to add rounded corners on images, follow these links:
- CSS Basics. How to Apply Rounded Corners On Images #1
- CSS Basics. How to Apply Rounded Corners On Images #2

Below are a few examples of these borders and how the images behave when you hover over them.
If you want to use one of these styles, just copy the code below the image, then go to Template, click on the Edit HTML button and paste that code before ]]></b:skin> (CTRL + F to find it)
.post-body img {
border:0;
padding:0;
-moz-transition: all 1s;
-webkit-transition: all 1s;
-o-transition: all 1s;
}
.post-body img:hover {
box-shadow: 0px 0px 15px #000; /* Shadow */
border-radius: 50%; /* Rounded border */
-moz-transition: all 1s;
-webkit-transition: all 1s;
-o-transition: all 1s;
cursor:pointer;
}
.post-body img {
background:#FFF; /* background color around the image */
padding:15px; /* space between border and image */
-moz-transition: all 1s;
-webkit-transition: all 1s;
-o-transition: all 1s;
}
.post-body img:hover {
box-shadow: 0px 0px 15px #000; /* Shadow */
border-radius: 0% 50%; /* Rounded border */
-moz-transition: all 1s;
-webkit-transition: all 1s;
-o-transition: all 1s;
cursor:pointer;
}
.post-body img {
background:#FFF; /* the background color around the image */
padding:15px; /* The Space Between Border and Image */
border-radius: 50% 0; /* Rounded border */
box-shadow: 0px 0px 15px #000; /* Shadow */
-moz-transition: all 1s;
-webkit-transition: all 1s;
-o-transition: all 1s;
}
.post-body img:hover {
border-radius:0; /* This removes the border roundness (value 0) */
-moz-transition: all 1s;
-webkit-transition: all 1s;
-o-transition: all 1s;
cursor:pointer;
}
.post-body img {
box-shadow: 0px 0px 15px #000; /* Shadow */
border-radius: 50%; /* Rounded border */
border:0;
padding:0;
-moz-transition: all 1s;
-webkit-transition: all 1s;
-o-transition: all 1s;
}
.post-body img:hover {
box-shadow: 0; /* With this we remove the shadow (value 0) */
border-radius: 0; /* This removes the border roundness (value 0) */
-moz-transition: all 1s;
-webkit-transition: all 1s;
-o-transition: all 1s;
cursor:pointer;
}
.post-body img {
border-radius: 45% / 20%; /* Rounded border */
box-shadow: 0px 0px 15px #000; /* Shadow */
padding:0;
-moz-transition: all 1s;
-webkit-transition: all 1s;
-o-transition: all 1s;
}
.post-body img:hover {
border-radius: 0; /* This removes the roundness of border (value 0) */
-moz-transition: all 1s;
-webkit-transition: all 1s;
-o-transition: all 1s;
cursor:pointer;
}
So these effects will apply to all images uploaded to your Blogger posts. But if you want to apply them only on certain pictures then change .post-body img with .rounded  and .post-body img:hover with .rounded:hover
Then add the rounded class selector in the image's code:
<img class="rounded" src="Image URL"/>
These are just some examples, however, you can modify them anytime by adding or deleting more CSS styles, it depends on everybody's tastes or needs. But as you have seen, we can make the images look way more attractive and this has been done only with CSS ;)
Read more ...


Monday, 3 June 2013

Horizontal menu with sub-tabs in two columns for Blogger

This is a very nice horizontal menu in which its sub-tabs are displayed in two columns and is also made with CSS, without any scripts.
blogger navigation menu, css menu, drop-down menu
The "advantage" so to speak, is that the sub-tabs when arranged in two columns are not very long, so it will be neat and less space along. You can see an example here:


Adding A Horizontal Menu With Sub Tabs in Two Columns To Blogger

STEP 1: In Blogger, go to your "Layout" and on the "Page Elements" section.
  • Click on the "Add a Gadget" link just under your header image
  • From the Gadget's List, select "HTML/JavaScript" option.
STEP 2: Simply copy and paste this ENTIRE code into your widget. Note: Leave the "Title" section of this widget blank.
<div id='menucol'>
<div id='topwrapper'>
<ul id='top'>
<li><a href='http://YOUR URL HERE.com'>Tab 1 Title Here</a></li>
<li><a href='http://YOUR URL HERE.com'>Tab 2 Title Here</a></li>
<li><a class='submenucol' href='#'>Tab 3 Title Here</a>
<ul>
<li><a href='http://YOUR URL HERE.com'>Sub Tab 3.1</a></li>
<li><a href='http://YOUR URL HERE.com'>Sub Tab 3.2</a></li>
<li><a href='http://YOUR URL HERE.com'>Sub Tab 3.3</a></li>
<li><a href='http://YOUR URL HERE.com'>Sub Tab 3.4</a></li>
<li><a href='http://YOUR URL HERE.com'>Sub Tab 3.5</a></li>
<li><a href='http://YOUR URL HERE.com'>Sub Tab 3.6</a></li>
</ul>
</li>
<li><a class='submenucol' href='#'>Tab 4 Title Here</a>
<ul>
<li><a href='http://YOUR URL HERE.com'>Sub Tab 4.1</a></li>
<li><a href='http://YOUR URL HERE.com'>Sub Tab 4.2</a></li>
<li><a href='http://YOUR URL HERE.com'>Sub Tab 4.3</a></li>
<li><a href='http://YOUR URL HERE.com'>Sub Tab 4.4</a></li>
<li><a href='http://YOUR URL HERE.com'>Sub Tab 4.5</a></li>
<li><a href='http://YOUR URL HERE.com'>Sub Tab 4.6</a></li>
</ul>
</li>
<li><a class='submenucol' href='#'>Tab 5 Title Here</a>
<ul>
<li><a href='http://YOUR URL HERE.com'>Sub Tab 5.1</a></li>
<li><a href='http://YOUR URL HERE.com'>Sub Tab 5.2</a></li>
<li><a href='http://YOUR URL HERE.com'>Sub Tab 5.3</a></li>
<li><a href='http://YOUR URL HERE.com'>Sub Tab 5.4</a></li>
<li><a href='http://YOUR URL HERE.com'>Sub Tab 5.5</a></li>
<li><a href='http://YOUR URL HERE.com'>Sub Tab 5.6</a></li>
<li><a href='http://YOUR URL HERE.com'>Sub Tab 5.7</a></li>
<li><a href='http://YOUR URL HERE.com'>Sub Tab 5.8</a></li>
</ul>
</li>
<li><a href='http://YOUR URL HERE.com'>Tab 6 Title Here</a></li>

</ul>
<br class='clearit'/>
</div>
</div>
Customize your main tabs by changing the Tab Titles to whatever you want. Include a URL for each one if you want it to be 'clickable'. If not, you can just put a # sign where it says http://YOUR URL HERE.com

You can add or delete as many of the main tabs as you need, just make sure to copy the entire code for the main tab for each additional tab you want:
<li><a href='http://YOUR URL HERE.com'>Tab 7 Title Here</a>
<ul>
<li><a href='http://YOUR URL HERE.com'>Sub Tab 7.1</a></li>
<li><a href='http://YOUR URL HERE.com'>Sub Tab 7.2</a></li>
<li><a href='http://YOUR URL HERE.com'>Sub Tab 7.3</a></li>
</ul>
</li>
STEP 3: Now let's go a step further and add the CSS style in our Template
  • Go to Template > Edit HTML
  • Click on the sideways arrow next to <b:skin>...</b:skin> 

  • Then click anywhere inside the code area and search - using CTRL + F keys - for the ]]></b:skin> tag and just above ]]></b:skin> add this code:
/* Horizontal menu with 2 columns
----------------------------------------------- */
#menucol {
width:940px;
height:37px;
background-image: -moz-linear-gradient(top, #666666, #000000);
background-image: -webkit-gradient(linear, left top, left bottom, color-stop(0.00, #666666), color-stop(1.0, #000000));
filter: progid:DXImageTransform.Microsoft.Gradient(gradientType=0,startColorStr=#666666,endColorStr=#000000);
border-bottom:1px solid #666666;
border-top:1px solid #666666;
margin:0 auto;padding:0 auto;
overflow:hidden;
}
#topwrapper {
width:940px;
height:40px;
margin:0 auto;
padding:0 auto;
}
.clearit {
clear: both;
height: 0;
line-height: 0.0;
font-size: 0;
}
#top {
width:100%;
}
#top, #top ul {
padding: 0;
margin: 0;
list-style: none;
}
#top a {
border-right:1px solid #333333;
text-align:left;
display: block;
text-decoration: none;
padding:10px 12px 11px;
font:bold 14px Arial;
text-transform:none;
color:#eee;
}
#top a:hover {
background:#000000;
color:#F6F6F6;
}
#top a.submenucol {
background-image: url(https://blogger.googleusercontent.com/img/b/R29vZ2xl/AVvXsEhVqzsb44sii7rJhi5OK3wUjLRxfhsUx3b3wy6u4b-2Hk_fJs6fDuPrHTW35wHSWtO2jKiEK32BipaCofCTVuQhs_9x-O5GYL0Om__ASekByrAILK8G1BNlPixJaCLDHM5lxxQNaf_z7Is/s1600/arrow_white.gif);
background-repeat: no-repeat;
padding: 10px 24px 11px 12px;
background-position: right center;
}
#top li {
float: left;
position: relative;
}
#top li {
position: static !important;
width: auto;
}
#top li ul, #top ul li {
width:300px;
}
#top ul li a {
text-align:left;
padding: 6px 15px;
font-size:13px;
font-weight:normal;
text-transform:none;
font-family:Arial, sans-serif;
border:none;
}
#top li ul {
z-index:100;
position: absolute;
display: none;
background-color:#F1F1F1;
margin-left:-80px;
padding:10px 0;
border-radius: 0px 0px 6px 6px;
box-shadow:0 2px 2px rgba(0,0,0,0.6);
filter:alpha(opacity=87);
opacity:.87;
}
#top li ul li {
width:150px;
float:left;
margin:0;
padding:0;
}
#top li:hover ul, #top li.hvr ul {
display: block;
}
#top li:hover ul a, #top li.hvr ul a {
color:#333;
background-color:transparent;
text-decoration:none;
}
#top ul a:hover {
text-decoration:underline!important;
color:#444444 !important;
}
  • Now find (CTRL + F) this line:
/* Tabs
  • It will also have some little lines beneath:
/* Tabs
----------------------------------------------- */
  • And just below these little lines, delete the code below until you reach at:
/* Columns
----------------------------------------------- */
  • Instead of the code that you have removed, add this one:
#crosscol ul {z-index: 200; padding:0 !important;}
#crosscol li:hover {position:relative;}
#crosscol ul li {padding:0 !important;}
.tabs-outer {z-index:1;}
.tabs-inner {padding: 0 0px;}
See this screenshot for more info:
menu for blogger, blogger gadgets, blogger widgets
STEP 4: The final step is to Save the Template and you are done!

Visit your blog to see a beautiful navigation menu just below header.
If you have any questions or need help, leave a comment below.
Read more ...


Saturday, 1 June 2013

Multi Hover Effect On Blogger Images Using Pure CSS

Today I'm going to show you how to add an amazing mouseover effect for Blogger images using only CSS, in which moving your mouse over an image from different directions (from above, from below, etc) will cause an overlay transitioned in from the same vector. This trick will change not only the images appearance when moving mouse over them, but will also allow you to add inside a text with a description.

hover effect, mouseover, blogger hover effects

You can see the effect on this image below: try moving your mouse from the left, right, and above.

hover right hover top hover left hover bottom

Adding Hover Effect From Different Directions on Blogger Images

First thing to do is to add the CSS style to our Template:

Step 1. From Blogger Dashboard, go to Template and press the Edit HTML button


Step 2. Search for the </head> tag - to find it, click anywhere inside the code area, press CTRL + F keys and type it in the search box.


Step 3. After you found it, add the following style just above it: 
<style>
  /* The container and the image */
  div.multi-hover {
    overflow: hidden;
    position: relative;
    vertical-align: middle;
    width: 100%;
    height: 358px;
    line-height: 358px;
  }
  div.multi-hover img {width: 100%;}

/* The texts that, by default, are hidden */
  div.multi-hover span {
    color: #FFF;
    font-size: 32px;
    font-weight: bold;
    height: 100%;
    opacity: 0;
    position: absolute;
    text-align: center;
    transition: all 0.3s linear 0s;
    width: 100%;
  }

/* And this is what will generate the effect */
  div.multi-hover span:nth-child(1) { /* right */
    background: none repeat scroll 0 0 rgba(255, 189, 36, 0.6);
    left: 90%;
    top: 0;
  }
  div.multi-hover span:nth-child(2) { /* top */
    background: none repeat scroll 0 0 rgba(106, 170, 255, 0.6);
    left: 0;
    top: -80%;
  }
  div.multi-hover span:nth-child(3) { /* left */
    background: none repeat scroll 0 0 rgba(204, 87, 166, 0.6);
    left: -90%;
    top: 0;
  }
  div.multi-hover span:nth-child(4) { /* bottom */
    background: none repeat scroll 0 0  rgba(97, 181, 115, 0.6);
    left: 0;
    top: 80%;
  }

  div.multi-hover span:hover {opacity: 1;}
  div.multi-hover span:nth-child(2n+1):hover {left: 0;}
  div.multi-hover span:nth-child(2n):hover {top: 0;}

</style>
Step 4. Save the Template

Now we are going to add the HTML that is nothing but a DIV where we included four SPAN tags with texts and an image:

Step 5. Choose Posts, create a New Post, click on the HTML tab (1) and paste this code inside the empty box:
<div class=multi-hover>
  <span>hover right</span>
  <span>hover top</span>
  <span>hover left</span>
  <span>hover bottom</span>
  <img src="https://blogger.googleusercontent.com/img/b/R29vZ2xl/AVvXsEhj9OMSy_mnZmX2A7XMfADAYrOy1r7pxs7kD9BF2v-oD2fuiCzAhKgAqxILWSbZa1cHQnAq_XzArzMk-Mr9AaW6yDearMb31WC-jyebQGQwVy2byOo51gQCXAWX8AAfQMVle-lchDHJXDQ/s1600/flowers">
</div>
Add your own text/description to "hover right", "hover top", "hover left" and "hover bottom" (2) and replace the url in blue with the image URL (3) where you want to apply the effect.

Important! Do not click on the Compose tab, otherwise the changes will be lost.


Step 6. After you finished editing your post, click Publish (4)

And that's it... enjoy! :)
Read more ...


Sunday, 14 April 2013

Create Horizontal Navigation Menu With Drop Down Submenus Using CSS

The following drop down menu is made only with CSS, is a horizontal menu with sub-tabs and the right side has a rounded search. A menu is handy for those who do not require complex menus or prefer not to use one that requires scripts and/or too many images, also the installation and customization is quite simple, and to top it off is quite functional.

To see this drop down menu in action, visit this demo blog

blogger menu, drop down menu, css menu

Prior to doing anything, if you are using a Template made through Blogger Template Designer, then you should consider doing these changes in the template, otherwise the menu might not be displayed correctly:

From your Blogger's Dashboard, go to Template (make a backup < see the screenshot) > Edit HTML:


and search (CTRL + F) for the following line:

<b:section class='tabs' id='crosscol' maxwidgets='1' showaddelement='yes'>

Screenshot

Remove the code in red.
You may have many parts as the one in red, delete all you find.

....then find this section in your template:
/* Tabs
----------------------------------------------- */

...and remove all that is within it, until you reach to the Headings part.

/* Tabs
----------------------------------------------- */
.tabs-outer {
overflow: hidden;
position: relative;
background: $(tabs.background.color) $(tabs.background.gradient) repeat scroll 0 0;
}

#layout .tabs-outer {
overflow: visible;
}

.tabs-cap-top, .tabs-cap-bottom {
position: absolute;
width: 100%;

border-top: 1px solid $(tabs.border.color);

}

.tabs-cap-bottom {
bottom: 0;
}

.tabs-inner .widget li a {
display: inline-block;

margin: 0;
padding: .6em 1.5em;

font: $(tabs.font);
color: $(tabs.text.color);

border-top: 1px solid $(tabs.border.color);
border-bottom: 1px solid $(tabs.border.color);
border-$startSide: 1px solid $(tabs.border.color);
}

.tabs-inner .widget li:last-child a {
border-$endSide: 1px solid $(tabs.border.color);
}

.tabs-inner .widget li.selected a, .tabs-inner .widget li a:hover {
background: $(tabs.selected.background.color) $(tabs.background.gradient) repeat-x scroll 0 -100px;
color: $(tabs.selected.text.color);
}

/* Headings
----------------------------------------------- */

Then add this to where the code has been removed (instead of the code in green):
#crosscol ul {z-index: 200; padding:0 !important;}
#crosscol li:hover {position:relative;}
#crosscol ul li {padding:0 !important;}
.tabs-outer {z-index:1;}
.tabs .widget ul, .tabs .widget ul {overflow: visible;}
Having done this, we can finally add our menu.

How To Add Horizontal Drop Down Menu to Blogger

To put this horizontal menu with submenus in your blog, then follow the next steps:

Step 1. From Template, go to Edit HTML and just above ]]></b:skin> paste these styles:
/* Horizontal drop down menu
----------------------------------------------- */
#menuWrapper {
width:100%; /* Menu width */
height:35px;
padding-left:14px;
background:#333; /* Background color */
border-radius: 10px; 
}
.menu {
padding:0;
margin:0;
list-style:none;
height:35px;
position:relative;
z-index:5;
font-family:arial, verdana, sans-serif;
}
.menu li:hover li a {
background:none;
}
.menu li.top {display:block; float:left;}
.menu li a.top_link {
display:block;
float:left;
height:35px;
line-height:34px;
color:#ccc;
text-decoration:none;
font-family:"Verdana", sans-serif;
font-size:12px; /* Font size */
font-weight:bold;
padding:0 0 0 12px;
cursor:pointer;
}
.menu li a.top_link span {
float:left;
display:block;
padding:0 24px 0 12px;
height:35px;
}
.menu li a.top_link span.down {
float:left;
display:block;
padding:0 24px 0 12px;
height:35px;
}
.menu li a.top_link:hover, .menu li:hover > a.top_link {color:#fff; }
.menu li:hover {position:relative; z-index:2;}
.menu ul,
.menu li:hover ul ul,
.menu li:hover ul li:hover ul ul,
.menu li:hover ul li:hover ul li:hover ul ul,
.menu li:hover ul li:hover ul li:hover ul li:hover ul ul
{position:absolute; left:-9999px; top:-9999px; width:0; height:0; margin:0; padding:0; list-style:none;}

.menu li:hover ul.sub {
left:0;
top:35px;
background:#333; /* Submenu background color */
padding:3px;
white-space:nowrap;
width:200px;
height:auto;
z-index:3;
}
.menu li:hover ul.sub li {
display:block;
height:30px;
position:relative;
float:left;
width:200px;
font-weight:normal;
}
.menu li:hover ul.sub li a{
display:block;
height:30px;
width:200px;
line-height:30px;
text-indent:5px;
color:#ccc;
text-decoration:none;
}
.menu li ul.sub li a.fly {
/* Submenu Background Color */
background:#333 url(https://blogger.googleusercontent.com/img/b/R29vZ2xl/AVvXsEjQp8rg31T5lQcCXwFSr5nhdXBqFDizJRPcDdJb7OLxwhN1Pvz0bdpTYd2cp6DzhyphenhyphenrTM8ZNmTa_ScjTuI3EIwVWhnV9V3BoZMKl_u4k_rumonsUq6yorUjH0NgGsPa5a9LjZXh8GYiE2pI/s1600/arrow_over.gif) 185px 10px no-repeat;}
.menu li:hover ul.sub li a:hover {
background:#515151; /* Background Color on mouseover */
color:#fff;
}
.menu li:hover ul.sub li a.fly:hover, .menu li:hover ul li:hover > a.fly {
/* Background on Mouseover */
background:#646464 url(https://blogger.googleusercontent.com/img/b/R29vZ2xl/AVvXsEjQp8rg31T5lQcCXwFSr5nhdXBqFDizJRPcDdJb7OLxwhN1Pvz0bdpTYd2cp6DzhyphenhyphenrTM8ZNmTa_ScjTuI3EIwVWhnV9V3BoZMKl_u4k_rumonsUq6yorUjH0NgGsPa5a9LjZXh8GYiE2pI/s1600/arrow_over.gif) 185px 10px no-repeat; color:#fff;}

.menu li:hover ul li:hover ul,
.menu li:hover ul li:hover ul li:hover ul,
.menu li:hover ul li:hover ul li:hover ul li:hover ul,
.menu li:hover ul li:hover ul li:hover ul li:hover ul li:hover ul {
left:200px;
top:-4px;
background: #333; /* Background Color of the Submenu */
padding:3px;
white-space:nowrap;
width:200px;
z-index:4;
height:auto;
}
#search {
width: 228px; /* Width of the Search Box */
height: 50px;
float: right;
z-index: 2;
text-align: center;
margin-top: 5px;
margin-right: 6px;
/* Background of the Search Box */
background: url(https://blogger.googleusercontent.com/img/b/R29vZ2xl/AVvXsEiSa9jcdUn1mq1HME01SEA2OQngYJ96ygylB7s9Andmvp18lNpbv5wyILZ8GDqq_I1BV8TiGCyNxrqdJyHwUvID0SIdSrMe3WP-aVgt-iHLtIK003PY_Yvaop8Z8O4bwkshCHezCVDvSPo/s1600/searchBar1.png) no-repeat;
}
#search-box {
margin-top: 3px;
border:0px;
background: transparent;
text-align:center;
}


Screenshot
Step 2. Save the Template


Step 3. Go to Layout > click on Add a Gadget link


Step 4. Choose HTML/Javascript and paste the following inside the empty box:

<div id='menuWrapper'>
<ul class='menu'>
<li class='top'><a class='top_link' href='Link URL'><span>Title 1</span></a></li>

<li class='top'><a class='top_link' href='Link URL'><span class='down'>Title 2</span></a><ul class='sub'><li><a class='fly' href='Link URL'>Submenu 2.1</a><ul>
<li><a href='Link URL'>Submenu 2.1.1</a></li>
<li><a href='Link URL'>Submenu 2.1.2</a></li>
<li><a href='Link URL'>Submenu 2.1.3</a></li>
</ul>
</li>
<li class='mid'><a class='fly' href='Link URL'>Submenu 2.2</a>
<ul>
<li><a href='Link URL'>Submenu 2.2.1</a></li>
<li><a href='Link URL'>Submenu 2.2.2</a></li>
<li><a href='Link URL'>Submenu 2.2.3</a></li>
<li><a class='fly' href='Link URL'>Submenu 2.2.4</a>
<ul>
<li><a href='Link URL'>Submenu 2.2.4.1</a></li>
<li><a href='Link URL'>Submenu 2.2.4.2</a></li>
<li><a href='Link URL'>Submenu 2.2.4.3</a></li>
</ul>
</li>
<li><a href='Link URL'>Submenu 2.2.5</a></li>
<li><a class='fly' href='Link URL'>Submenu 2.2.6</a>
<ul>
<li><a href='Link URL'>Submenu 2.2.6.1</a></li>
<li><a href='Link URL'>Submenu 2.2.6.2</a></li>
</ul>
</li>
</ul>
</li>
<li><a href='Link URL'>Submenu 2.3</a></li>
<li><a href='Link URL'>Submenu 2.4</a></li>
<li><a href='Link URL'>Submenu 2.5</a></li>
</ul>
</li>

<li class='top'><a class='top_link' href='Link URL'><span class='down'>Title 3</span></a>
<ul class='sub'>
<li><a href='Link URL'>Submenu 3.1</a></li>
<li><a href='Link URL'>Submenu 3.2</a></li>
<li><a href='Link URL'>Submenu 3.3</a></li>
<li><a href='Link URL'>Submenu 3.4</a></li>
</ul>
</li>

<li class='top'><a class='top_link' href='Link URL'><span class='down'>Title 4</span></a>
<ul class='sub'>
<li><a href='Link URL'>Submenu 4.1</a></li>
<li><a class='fly' href='Link URL'>Submenu 4.2</a>
<ul>
<li><a href='Link URL'>Submenu 4.2.1</a></li>
<li><a href='Link URL'>Submenu 4.2.2</a></li>
<li><a href='Link URL'>Submenu 4.2.3</a></li>
<li><a href='Link URL'>Submenu 4.2.4</a></li>
<li><a href='Link URL'>Submenu 4.2.5</a></li>
<li><a href='Link URL'>Submenu 4.2.6</a></li>
</ul>
</li>
<li><a href='Link URL'>Submenu 4.3</a></li>
<li><a href='Link URL'>Submenu 4.4</a></li>
<li><a href='Link URL'>Submenu 4.5</a></li>
<li><a href='Link URL'>Submenu 4.6</a></li>
</ul>
</li>

<li class='top'><a class='top_link' href='Link URL'><span class='down'>Title 5</span></a>
<ul class='sub'>
<li><a href='Link URL'>Submenu 5.1</a></li>
<li><a href='Link URL'>Submenu 5.2</a></li>
<li><a href='Link URL'>Submenu 5.3</a></li>
</ul>
</li>


<!-- Search Bar -->
<li>
<form action='/search' id='search' method='get' name='searchForm' style='display:inline;'>
<input id='search-box' name='q' onblur='if (this.value == &quot;&quot;) this.value = &quot;Search here...&quot;;' onfocus='if (this.value == &quot;Search here...&quot;) this.value = &quot;&quot;;' size='28' type='text' value='Search here...'/></form>
</li>

</ul>
</div>

Customization:

- replace the text in blue and red with your links and titles.
- if you need more tabs, then add a line like this just above <!-- Search Bar -->

<li class="top"><a href="Link URL" class="top_link"><span>Title</span></a></li>

- if you want to add a tab with sub-tabs, then add this code:

<li class="top"><a href="Link URL" class="top_link"><span class="down">Title</span></a>
<ul class="sub">
<li><a href="Link URL">Submenu Title</a></li>
</ul>
</li>

- and if you want one of the other sub-tabs have sub-tabs then remove a line like the one in orange and change it to a code like this:

<li><a href="Link URL" class="fly">Submenu Title</a>
<ul>
<li><a href="Link URL">Other Submenu</a></li>
</ul>
</li>

And that's it! Now Save your Widget and enjoy your new drop down menu! ;)
Read more ...


Wednesday, 20 March 2013

CSS Basics. How to Apply Rounded Corners On Images #2

blogger tricks, css tricks, border radiusIn the previous post I have mentioned that we will learn to round images using CSS, without needing to edit them one by one using a program. Now that we have seen the basics of CSS, let's try to apply to some images.

What we will do is to upload an image as normal (HTML) and then add some rules in our style sheet that will transform the outer shape as a circle... or at least to appear round. This will depend on the proportions of image that we use.

In fact, we can apply this effect to any image, to all of an area or to all in our blog. That depends on your tastes.

Marking up HTML

Obviously the first thing we need for in order to round an image is an idem. The code could be more complicated, but an image is built within the img tag and basically looks like this:

<img src="image_URL"/>

Screenshot:


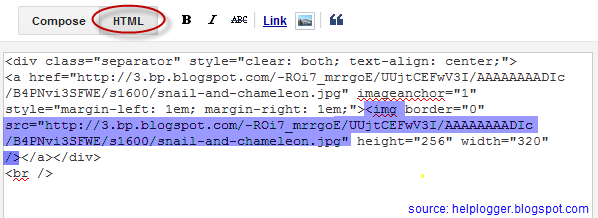
This is how we make it look something like the one from the left. Normally, it should also keep an alt text and sometimes it carries some forced dimensions (with width and/or height). When you upload an image, the code inside the Blogger editor also contains a link that is pointing to the original image.

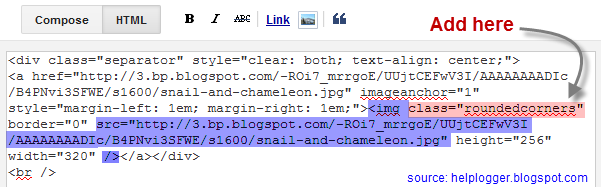
But if we want to modify this image using CSS, we need to incorporate a class selector. We can add it in two ways: within the img tag or to a parent box. The name that I have chosen for the selector is roundedcorners:

<img class="roundedcorners" src="image_URL"/>


<div class="roundedcorners">
<img src="image_URL"/>
</div>


Applying style to all homogeneous elements

But that selector alone will do nothing. It needs to be linked to a style rule that tells what to do with it. As much as we add classes, if these are not defined in the CSS, the appearance of the image (or a certain element) will not change.

To change the shape of all the images on our blog, this would be what we should add to our CSS:

img {
border: 2px solid #BADA55;
margin: 0;
padding: 0;
border-radius: 900px;
-moz-border-radius: 900px;
}

And how it translates to your browser? As follows:

Search for images by name tag (img) and apply the following style:
  • a solid green border of 2 pixels
  • margins (space outside the border) and padding (space inside the border) is set to zero
  • the image is round at the four corners

Now that we have this rule in our style sheet itself, we can see the picture as we wanted - see the example on the right.

To declare a property correctly, we need to know what it does and how to write and you can find more info in many places, although W3C is the authority in this.

For example border-radius requires initially 4 values reading from left to right that represent the roundness of the upper-left, upper-right, lower-right and lower-left corner. If you put a single value is understood that all four will be equal to that.

You should also know that when the value of the border exceeds the dimensions of the box, this border is adapted to form a circle.

How to Apply Style to the Elements of the Same Block

But surely we do not want all the blog images to be round, but only those that we choose, otherwise adding the above style in the head tag will make all of our blog images to take this shape. Before we used an HTML tag (img) and not a selector and that is why the style will affect all images.

To avoid this, we can do one of the things we saw at the beginning and that was to put the image inside a div with the roundedcorners class. In this way, only the images that are in a box with that class will be affected by the rule that will make them round.

<div class="roundedcorners"><img src="image_URL"/></div>

But the rule then should not attack the img tag directly, but the roundedcorners selector. In this case, you should write it like this:

.roundedcorners img {
border: 2px solid #BADA55;
....
}

This means that this style applies only to images that are in a box with roundedcorners class.

Epilogue

To close the subtopic of rounding images, you have to keep in mind that if these are not square, instead of becoming circular, they will look oval.


To fix this we should add the width and height with the same measure (value in pixels), that is to force the image cropping and to make it appear perfectly circular. That was all!

If you enjoy reading this blog, please share and subscribe. For any questions, drop a comment below ;)

Read more ...


Poll