Sunday, 22 December 2013

How to Use Character Entities in CSS, HTML and JavaScript

Sometimes, when using scripts, we must write special characters like accents by using a special set of codes called character entities, however these don't always look good or we get a question mark or other strange symbols. Usually, this is solved if the character encoding is done right but the logic may not always work.

In Blogger, special characters most of the time appear correctly, but when it is about other services, like external files, things can get complicated.

For example, this usually looks good and when you click on this link, you should see the letters in the right way:
alert(" á é í ó ú  ☺ ✛ ❤ ");
If we are trying to use other method and we want to use this type of characters, sometimes we need to write them in a special format called escape sequence which is nothing but a backslash followed by a letter and a number in hexadecimal format. In the case of common characters or accents, it would be \x followed by two hex digits:
\xe1 is the letter á
\xe9 is the letter é
\xed is the letter í
\xf3 is the letter ó
\xfa is the letter ú
Other combinations generate special characters:
\n is a line break
\t is the tab character
\' is single quote
\" is double quote
\\ is a back slash
Or we can use \u followed by the Unicode character code expressed as four hexadecimal digits:
\u00e1 is the letter á
\u00e9 is the letter é
\u00ed is the letter í
\u00f3 is the letter ó
\u00fa is the letter ú
this will allow us to see correctly what we couldn't before if we were using some other services:
alert(" \u263a \u2764 \u271b ");
On this page you can find a comprehensive list of all the characters, both symbols and different alphabets.

Although rare characters are not often used in the CSS, there is a case when they are necessary as well, like when using the content property with the :after and :before pseudo-elements.

The same criteria applies there, but we only need to add a backslash followed by the four-digit hexadecimal code. For example:
content: ":\24d1\24d4\24d5\24de\24e1\24d4";

content: ":after  \263a  \2724  \2602";
:ⓑⓔⓕⓞⓡⓔ
:after ☺ ✤ ☂

Remember that IE doesn't understand the :before pseudoclass with content, and you would have to set the list-style-type property as none, or you would get 2 bullets in CSS compliant browsers.
Read more ...


How to Create a Sitemap or Table of Contents in Blogger

One of the limitations of a blog is that it doesn't have an index or sitemap of the site that could make it easier for readers to find content that they are searching for.
While the blog archive and labels have all the information about the published post, these do not appear on a single page completely, so searching for more posts is not always easy.

Luckily, this gadget will help you to add a table of contents or sitemap on Blogger showing the index of all posts separated by categories that have been published. It will also show the latest posts with a text saying New!

table of contents, sitemap, blogger

Demo: You can see it working by clicking here.

How To Add a Sitemap with a List of Posts to Blogger


To implement it on your blog, follow the steps below:

Step 1. Login to your Blogger Dashboard and select your blog
Step 2. Go to Pages > click the New Page button and select Blank page


Step 3.  Click on the HTML tab and paste the following code inside the empty box:
<style>
p.labels a{color: #242424; text-transform: uppercase;font-size: 15px;}
a.post-titles {color: #0000FF;}
ol li{list-style-type:decimal;line-height:25px;}
</style>
<script>
//<![CDATA[
var postTitle=new Array();var postUrl=new Array();var postPublished=new Array();var postDate=new Array();var postLabels=new Array();var postRecent=new Array();var sortBy="titleasc";var tocLoaded=false;var numChars=250;var postFilter="";var numberfeed=0;function bloggersitemap(a){function b(){if("entry" in a.feed){var d=a.feed.entry.length;numberfeed=d;ii=0;for(var h=0;h<d;h++){var n=a.feed.entry[h];var e=n.title.$t;var m=n.published.$t.substring(0,10);var j;for(var g=0;g<n.link.length;g++){if(n.link[g].rel=="alternate"){j=n.link[g].href;break}}var o="";for(var g=0;g<n.link.length;g++){if(n.link[g].rel=="enclosure"){o=n.link[g].href;break}}var c="";if("category" in n){for(var g=0;g<n.category.length;g++){c=n.category[g].term;var f=c.lastIndexOf(";");if(f!=-1){c=c.substring(0,f)}postLabels[ii]=c;postTitle[ii]=e;postDate[ii]=m;postUrl[ii]=j;postPublished[ii]=o;if(h<10){postRecent[ii]=true}else{postRecent[ii]=false}ii=ii+1}}}}}b();sortBy="titleasc";sortPosts(sortBy);sortlabel();tocLoaded=true;displayToc2();document.write('</br><div class="sitemap-link"><a href="http://helplogger.blogspot.com/2013/12/add-sitemap-table-of-contents-to-blogger.html" style="font-size: 10px; text-decoration:none; color: #5146CD;">Get This Widget</a></div>')}function filterPosts(a){scroll(0,0);postFilter=a;displayToc(postFilter)}function allPosts(){sortlabel();postFilter="";displayToc(postFilter)}function sortPosts(d){function c(e,g){var f=postTitle[e];postTitle[e]=postTitle[g];postTitle[g]=f;var f=postDate[e];postDate[e]=postDate[g];postDate[g]=f;var f=postUrl[e];postUrl[e]=postUrl[g];postUrl[g]=f;var f=postLabels[e];postLabels[e]=postLabels[g];postLabels[g]=f;var f=postPublished[e];postPublished[e]=postPublished[g];postPublished[g]=f;var f=postRecent[e];postRecent[e]=postRecent[g];postRecent[g]=f}for(var b=0;b<postTitle.length-1;b++){for(var a=b+1;a<postTitle.length;a++){if(d=="titleasc"){if(postTitle[b]>postTitle[a]){c(b,a)}}if(d=="titledesc"){if(postTitle[b]<postTitle[a]){c(b,a)}}if(d=="dateoldest"){if(postDate[b]>postDate[a]){c(b,a)}}if(d=="datenewest"){if(postDate[b]<postDate[a]){c(b,a)}}if(d=="orderlabel"){if(postLabels[b]>postLabels[a]){c(b,a)}}}}}function sortlabel(){sortBy="orderlabel";sortPosts(sortBy);var a=0;var b=0;while(b<postTitle.length){temp1=postLabels[b];firsti=a;do{a=a+1}while(postLabels[a]==temp1);b=a;sortPosts2(firsti,a);if(b>postTitle.length){break}}}function sortPosts2(d,c){function e(f,h){var g=postTitle[f];postTitle[f]=postTitle[h];postTitle[h]=g;var g=postDate[f];postDate[f]=postDate[h];postDate[h]=g;var g=postUrl[f];postUrl[f]=postUrl[h];postUrl[h]=g;var g=postLabels[f];postLabels[f]=postLabels[h];postLabels[h]=g;var g=postPublished[f];postPublished[f]=postPublished[h];postPublished[h]=g;var g=postRecent[f];postRecent[f]=postRecent[h];postRecent[h]=g}for(var b=d;b<c-1;b++){for(var a=b+1;a<c;a++){if(postTitle[b]>postTitle[a]){e(b,a)}}}}function displayToc(a){var l=0;var h="";var e="Post Title";var m="Click to sort by title";var d="Date";var k="Click to sort by date";var c="Category";var j="";if(sortBy=="titleasc"){m+=" (descending)";k+=" (newest first)"}if(sortBy=="titledesc"){m+=" (ascending)";k+=" (newest first)"}if(sortBy=="dateoldest"){m+=" (ascending)";k+=" (newest first)"}if(sortBy=="datenewest"){m+=" (ascending)";k+=" (oldest first)"}if(postFilter!=""){j="Click to view all"}h+="<table>";h+="<tr>";h+='<td class="header1">';h+='<a href="javascript:toggleTitleSort();" title="'+m+'">'+e+"</a>";h+="</td>";h+='<td class="header2">';h+='<a href="javascript:toggleDateSort();" title="'+k+'">'+d+"</a>";h+="</td>";h+='<td class="header3">';h+='<a href="javascript:allPosts();" title="'+j+'">'+c+"</a>";h+="</td>";h+='<td class="header4">';h+="Read all";h+="</td>";h+="</tr>";for(var g=0;g<postTitle.length;g++){if(a==""){h+='<tr><td class="entry1"><a href="'+postUrl[g]+'">'+postTitle[g]+'</a></td><td class="entry2">'+postDate[g]+'</td><td class="entry3">'+postLabels[g]+'</td><td class="entry4"><a href="'+postPublished[g]+'">Read</a></td></tr>';l++}else{z=postLabels[g].lastIndexOf(a);if(z!=-1){h+='<tr><td class="entry1"><a href="'+postUrl[g]+'">'+postTitle[g]+'</a></td><td class="entry2">'+postDate[g]+'</td><td class="entry3">'+postLabels[g]+'</td><td class="entry4"><a href="'+postPublished[g]+'">Read</a></td></tr>';l++}}}h+="</table>";if(l==postTitle.length){var f='<span class="toc-note">Show All '+postTitle.length+" Posts<br/></span>"}else{var f='<span class="toc-note">Show '+l+" posts by category '";f+=postFilter+"' the "+postTitle.length+" Total Posts<br/></span>"}var b=document.getElementById("toc");b.innerHTML=f+h}function displayToc2(){var a=0;var b=0;while(b<postTitle.length){temp1=postLabels[b];document.write("<p/>");document.write('<p class="labels"><a href="/search/label/'+temp1+'">'+temp1+"</a></p><ol>");firsti=a;do{document.write("<li>");document.write('<a class="post-titles" href="'+postUrl[a]+'">'+postTitle[a]+"</a>");if(postRecent[a]==true){document.write(' - <strong><span style="color: rgb(255, 0, 0);">New!</span></strong>')}document.write("</li>");a=a+1}while(postLabels[a]==temp1);b=a;document.write("</ol>");sortPosts2(firsti,a);if(b>postTitle.length){break}}}function toggleTitleSort(){if(sortBy=="titleasc"){sortBy="titledesc"}else{sortBy="titleasc"}sortPosts(sortBy);displayToc(postFilter)}function toggleDateSort(){if(sortBy=="datenewest"){sortBy="dateoldest"}else{sortBy="datenewest"}sortPosts(sortBy);displayToc(postFilter)}function showToc(){if(tocLoaded){displayToc(postFilter);var a=document.getElementById("toclink")}else{alert("Just wait... TOC is loading")}}function hideToc(){var a=document.getElementById("toc");a.innerHTML="";var b=document.getElementById("toclink");b.innerHTML='<a href="#" onclick="scroll(0,0); showToc(); Effect.toggle(\'toc-result\',\'blind\');">?? Display Table of Contents</a> <img src="https://blogger.googleusercontent.com/img/b/R29vZ2xl/AVvXsEiCtLRPi7gDuOeHC-ZH3r5OQSaeirZJRmghZRm6ySU7mxL8Z4kWw30LEW2fXuOZN7Qzag-Vw_nmQmoFCoE4jzVWZCt0OIBsw3GQ82ski_MOpJos3ScG7cRkMxq9efkKaokXoTGvxwS6RfoO/s1600/new_icon.gif"/>'}function looptemp2(){for(var a=0;a<numberfeed;a++){document.write("<br>");document.write('Post Link : <a href="'+postUrl[a]+'">'+postTitle[a]+"</a><br>");document.write('Read all : <a href="'+postPublished[a]+'">'+postTitle[a]+"</a><br>");document.write("<br>")}};
//]]>
</script>
<script src="http://helplogger.blogspot.com/feeds/posts/default?max-results=9999&amp;alt=json-in-script&amp;callback=bloggersitemap"></script>
After adding the above code, replace http://helplogger.blogspot.com with the address of your blog.

Customization:

- to change the color and font size of categories title, replace the values in red
- to change the color of the links, replace the value in green

Step 4. Click Options on the right side and select Don't allow (hide existing) for the reader's comments

Step 5. Finally, click the Publish button and View the page.

That's all!

The index of the posts is sorted alphabetically and is updated automatically each time a new post is published.
Read more ...


Friday, 20 December 2013

Using JQuery + EasyDrag to Move Elements or Images by Clicking on Them

This is one way to make your site more interactive so that readers can "play" with certain elements of the page being able to drag from one side to another within the container in which they are, i.e. can drag the images with a script that will allow them to move from one place to another within the blog.

Demo

You can see an example in this test blog

To create this effect on images


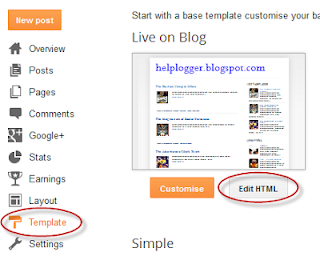
Login to your Blogger account, go to Template and click the Edit HTML button:


Click anywhere inside the template's code and press the CTRL + F keys to search for this tag:
</head>
Just before </head> paste the following scripts:
<script src='http://code.jquery.com/jquery-latest.js' type='text/javascript'/>
<script src='http://helplogger.googlecode.com/svn/trunk/jquery.easydrag.js' type='text/javascript'/>
Note: If you already have jquery, please remove the code in red.

Now when you want to drag an image, use this code inside the HTML of your post or of your page:
<img id="easydrag1" src="image-URL" style="border: 0px none; cursor: move;" />
<script type="text/javascript">
$(function(){ $("#easydrag1").easydrag();});
</script>
Change the URL of the image where is indicated, and furthermore, it is important that each image has a unique ID, in this example the ID is called easeydrag1, that ID must be twice.

If you have another picture with this effect, then you should put a different image with other ID, for example easydrag2, otherwise it will not work:
<img id="easydrag1" src="image-URL" style="border: 0px none; cursor: move;" />
<script type="text/javascript">
<img id="easydrag2" src="image-URL" style="border: 0px none; cursor: move;" />
<script type="text/javascript">
$(function(){ $("#easydrag1").easydrag();});
$(function(){ $("#easydrag2").easydrag();});
</script>
And how do you do if you want to put a link to the image?

We will set one Javascript function, so that when we will double click on it to open the page we want.

In this case, the code you would use, would be this:
<img id="easydrag1" style="cursor:move; border:0px;" ondblClick="javascript:window.open('link-URL')" src="image-URL" /><script type="text/javascript">
$(function(){ $("#easydrag1").easydrag();});
</script>
With this the picture can be without any problems dragged around and can be activated by double clicking on its link.
Read more ...


Filter out your visits to your blog from Google Analytics traffic statistics

The results of daily visits in the web hit counters always have a margin of error. In most of them, this margin is very high, therefore the statistics shown are not even a bit closer to the actual visits we have. Google Analytics has a very short margin of error, which makes it more reliable, so that we have a better idea of how many people visit us.

However, if you visit your own website, either to check if everything works well, to review comments, to answer them, to see if anyone is online, or just because you need to enter, then your visit will also be registered in the counter. This implies that the margin of error is larger again, because those visits are not our actual visits and we are not interested in knowing how many times we are coming back to our site, but how many people from elsewhere are visiting.

Therefore what we can do is to filter our IP so that we won't be registered in the statistics and thus to get "cleaner" results on the total number of visits and page views.
  1. The first thing is to find out what is your IP address. Just type "what is my ip address" on google and above all of the results it will say "Your public IP address is..." or you can use an online service that shows your IP. There are many of these sites, one of them being http://whatismyipaddress.com... just go to the site and it will automatically show your IP.
  2. Login to your Google Analytics account and click Admin in the orage bar on the right side. This will take you to the account administration screen 
  3. On the left is the Account section and below you'll find a tab called All Filters, just click the "+NEW FILTER" button.
  4. Give the filter any name you'd like. Filter Type is "Predefined filter", "Exclude", choose "traffic from the IP addresses" and "that are equal to" then enter your four numbered IP address you looked up in step 1.  Check whether it's IPv6 or not (if you don't know leave it unchecked).
  5. Save the changes.
Screenshot:

google analytics filters


You can add as many IP as you want, depending on how many different computers you use to access your site. And that's it. Now you can browse your site without registering a click in the Google Analytics metrics.
Read more ...


Tuesday, 17 December 2013

How To Add Snow In The Background of Your Blog Using CSS

falling snow, snow, winter background, bloggerToday we’re going to go over a super simple CSS technique that you can use to make it snow on your Blogger blog. It seems particularly attractive since it doesn't require scripts, only CSS and three small images.

An advantage of this method is that by not using scripts doesn't overload the blog, the disadvantage is that users with not so modern browsers, will not be able to see it (in Internet Explorer works for version 10 and up).

The snow will fall in the background of the blog, which, in addition, prevent interfering with links or content (because the flakes are images), also prevent blocking the visibility of the content of the blog.

You can see the demo in this test blog.

How To Add Falling Snow To Blogger Blogspot


Step 1. Go to Template and click on the Edit HTML button:


Step 2. Click the small arrow on the left of <b:skin>...</b:skin> to expand the style (screenshot 1) and click anywhere inside the code area to search by using the CTRL + F keys for the ]]></b:skin> tag (screenshot 2)

Step 3. Add the following code just above it:
/* Snow falling for Blogger
----------------------------------------------- */
@keyframes snow {
0% {background-position: 0px 0px, 0px 0px, 0px 0px;}
100% {background-position: 500px 1000px, 400px 400px, 300px 300px;}
}

@-moz-keyframes snow {
0% {background-position: 0px 0px, 0px 0px, 0px 0px;}
100% {background-position: 500px 1000px, 400px 400px, 300px 300px;}
}

@-webkit-keyframes snow {
0% {background-position: 0px 0px, 0px 0px, 0px 0px;}
100% {background-position: 500px 1000px, 400px 400px, 300px 300px;}
}

@-ms-keyframes snow {
0% {background-position: 0px 0px, 0px 0px, 0px 0px;}
100% {background-position: 500px 1000px, 400px 400px, 300px 300px;}
}

#falling-snow {
background-image: url(https://blogger.googleusercontent.com/img/b/R29vZ2xl/AVvXsEglccati7AUTu_8YmxQDAjJ39vucPa1PD7I8cG3curSoVL0RB8Ec3KfYDI_QqN2lnGV1-1aJlVIbt_YhxsZyr0OX0bAflQRgNw3a0qciHXytmTgzKz-3w63tdcXJhZj42AnEnCCC-vC5MNY/s1600/snow.png), url(https://blogger.googleusercontent.com/img/b/R29vZ2xl/AVvXsEiBP3-KP8x33KQuBkxDEOQLZI6lziy8qkk9E6yBDQau0Gx0WGEYBQEdD5Nd9SlKCPnY7LtQtMjq2NBSxkM6ewk35fArttINLi3QZ2UHcoeIS_HVPvuOiVSs0O-GVfan4oisRc4_Z5I5Nfji/s1600/snow3.png), url(https://blogger.googleusercontent.com/img/b/R29vZ2xl/AVvXsEica4B_JTA0a_0MB8MaGbXQlWpFHCWIcvB2FkVHAaBaINaRie5qy7g7SGvwr03PhalD6xPKD4f-WCUeZ4keqo0DQchQIvb98H76tMjk1VEPtrH179kM7nKSsx8sqeuCS6Yf43AWsSeK_IPs/s1600/snow2.png);
-webkit-animation: snow 20s linear infinite;
-moz-animation: snow 20s linear infinite;
-ms-animation: snow 20s linear infinite;
animation: snow 20s linear infinite;
}
Screenshot 1: 


Screenshot 2:


Step 3. Now, search (CTRL + F) the <body> tag or if you can't find it, search this line below:
<body expr:class='&quot;loading&quot; + data:blog.mobileClass'>
Step 4. And just below, add this:
<div id='falling-snow'>
Step 5. Finally, find the </body> tag (CTRL + F) and add the following just above it:
</div>
Step 6. Save the changes and that's it. Enjoy!!! :)

As you can see this tricks is very simple and easy to install, does not block the visibility of blog's content and most important, it has no scripts, only CSS and nothing else.
Read more ...


Poll