Showing posts with label posts. Show all posts

Sunday, 22 December 2013

How to Create a Sitemap or Table of Contents in Blogger

One of the limitations of a blog is that it doesn't have an index or sitemap of the site that could make it easier for readers to find content that they are searching for.
While the blog archive and labels have all the information about the published post, these do not appear on a single page completely, so searching for more posts is not always easy.

Luckily, this gadget will help you to add a table of contents or sitemap on Blogger showing the index of all posts separated by categories that have been published. It will also show the latest posts with a text saying New!

table of contents, sitemap, blogger

Demo: You can see it working by clicking here.

How To Add a Sitemap with a List of Posts to Blogger


To implement it on your blog, follow the steps below:

Step 1. Login to your Blogger Dashboard and select your blog
Step 2. Go to Pages > click the New Page button and select Blank page


Step 3.  Click on the HTML tab and paste the following code inside the empty box:
<style>
p.labels a{color: #242424; text-transform: uppercase;font-size: 15px;}
a.post-titles {color: #0000FF;}
ol li{list-style-type:decimal;line-height:25px;}
</style>
<script>
//<![CDATA[
var postTitle=new Array();var postUrl=new Array();var postPublished=new Array();var postDate=new Array();var postLabels=new Array();var postRecent=new Array();var sortBy="titleasc";var tocLoaded=false;var numChars=250;var postFilter="";var numberfeed=0;function bloggersitemap(a){function b(){if("entry" in a.feed){var d=a.feed.entry.length;numberfeed=d;ii=0;for(var h=0;h<d;h++){var n=a.feed.entry[h];var e=n.title.$t;var m=n.published.$t.substring(0,10);var j;for(var g=0;g<n.link.length;g++){if(n.link[g].rel=="alternate"){j=n.link[g].href;break}}var o="";for(var g=0;g<n.link.length;g++){if(n.link[g].rel=="enclosure"){o=n.link[g].href;break}}var c="";if("category" in n){for(var g=0;g<n.category.length;g++){c=n.category[g].term;var f=c.lastIndexOf(";");if(f!=-1){c=c.substring(0,f)}postLabels[ii]=c;postTitle[ii]=e;postDate[ii]=m;postUrl[ii]=j;postPublished[ii]=o;if(h<10){postRecent[ii]=true}else{postRecent[ii]=false}ii=ii+1}}}}}b();sortBy="titleasc";sortPosts(sortBy);sortlabel();tocLoaded=true;displayToc2();document.write('</br><div class="sitemap-link"><a href="http://helplogger.blogspot.com/2013/12/add-sitemap-table-of-contents-to-blogger.html" style="font-size: 10px; text-decoration:none; color: #5146CD;">Get This Widget</a></div>')}function filterPosts(a){scroll(0,0);postFilter=a;displayToc(postFilter)}function allPosts(){sortlabel();postFilter="";displayToc(postFilter)}function sortPosts(d){function c(e,g){var f=postTitle[e];postTitle[e]=postTitle[g];postTitle[g]=f;var f=postDate[e];postDate[e]=postDate[g];postDate[g]=f;var f=postUrl[e];postUrl[e]=postUrl[g];postUrl[g]=f;var f=postLabels[e];postLabels[e]=postLabels[g];postLabels[g]=f;var f=postPublished[e];postPublished[e]=postPublished[g];postPublished[g]=f;var f=postRecent[e];postRecent[e]=postRecent[g];postRecent[g]=f}for(var b=0;b<postTitle.length-1;b++){for(var a=b+1;a<postTitle.length;a++){if(d=="titleasc"){if(postTitle[b]>postTitle[a]){c(b,a)}}if(d=="titledesc"){if(postTitle[b]<postTitle[a]){c(b,a)}}if(d=="dateoldest"){if(postDate[b]>postDate[a]){c(b,a)}}if(d=="datenewest"){if(postDate[b]<postDate[a]){c(b,a)}}if(d=="orderlabel"){if(postLabels[b]>postLabels[a]){c(b,a)}}}}}function sortlabel(){sortBy="orderlabel";sortPosts(sortBy);var a=0;var b=0;while(b<postTitle.length){temp1=postLabels[b];firsti=a;do{a=a+1}while(postLabels[a]==temp1);b=a;sortPosts2(firsti,a);if(b>postTitle.length){break}}}function sortPosts2(d,c){function e(f,h){var g=postTitle[f];postTitle[f]=postTitle[h];postTitle[h]=g;var g=postDate[f];postDate[f]=postDate[h];postDate[h]=g;var g=postUrl[f];postUrl[f]=postUrl[h];postUrl[h]=g;var g=postLabels[f];postLabels[f]=postLabels[h];postLabels[h]=g;var g=postPublished[f];postPublished[f]=postPublished[h];postPublished[h]=g;var g=postRecent[f];postRecent[f]=postRecent[h];postRecent[h]=g}for(var b=d;b<c-1;b++){for(var a=b+1;a<c;a++){if(postTitle[b]>postTitle[a]){e(b,a)}}}}function displayToc(a){var l=0;var h="";var e="Post Title";var m="Click to sort by title";var d="Date";var k="Click to sort by date";var c="Category";var j="";if(sortBy=="titleasc"){m+=" (descending)";k+=" (newest first)"}if(sortBy=="titledesc"){m+=" (ascending)";k+=" (newest first)"}if(sortBy=="dateoldest"){m+=" (ascending)";k+=" (newest first)"}if(sortBy=="datenewest"){m+=" (ascending)";k+=" (oldest first)"}if(postFilter!=""){j="Click to view all"}h+="<table>";h+="<tr>";h+='<td class="header1">';h+='<a href="javascript:toggleTitleSort();" title="'+m+'">'+e+"</a>";h+="</td>";h+='<td class="header2">';h+='<a href="javascript:toggleDateSort();" title="'+k+'">'+d+"</a>";h+="</td>";h+='<td class="header3">';h+='<a href="javascript:allPosts();" title="'+j+'">'+c+"</a>";h+="</td>";h+='<td class="header4">';h+="Read all";h+="</td>";h+="</tr>";for(var g=0;g<postTitle.length;g++){if(a==""){h+='<tr><td class="entry1"><a href="'+postUrl[g]+'">'+postTitle[g]+'</a></td><td class="entry2">'+postDate[g]+'</td><td class="entry3">'+postLabels[g]+'</td><td class="entry4"><a href="'+postPublished[g]+'">Read</a></td></tr>';l++}else{z=postLabels[g].lastIndexOf(a);if(z!=-1){h+='<tr><td class="entry1"><a href="'+postUrl[g]+'">'+postTitle[g]+'</a></td><td class="entry2">'+postDate[g]+'</td><td class="entry3">'+postLabels[g]+'</td><td class="entry4"><a href="'+postPublished[g]+'">Read</a></td></tr>';l++}}}h+="</table>";if(l==postTitle.length){var f='<span class="toc-note">Show All '+postTitle.length+" Posts<br/></span>"}else{var f='<span class="toc-note">Show '+l+" posts by category '";f+=postFilter+"' the "+postTitle.length+" Total Posts<br/></span>"}var b=document.getElementById("toc");b.innerHTML=f+h}function displayToc2(){var a=0;var b=0;while(b<postTitle.length){temp1=postLabels[b];document.write("<p/>");document.write('<p class="labels"><a href="/search/label/'+temp1+'">'+temp1+"</a></p><ol>");firsti=a;do{document.write("<li>");document.write('<a class="post-titles" href="'+postUrl[a]+'">'+postTitle[a]+"</a>");if(postRecent[a]==true){document.write(' - <strong><span style="color: rgb(255, 0, 0);">New!</span></strong>')}document.write("</li>");a=a+1}while(postLabels[a]==temp1);b=a;document.write("</ol>");sortPosts2(firsti,a);if(b>postTitle.length){break}}}function toggleTitleSort(){if(sortBy=="titleasc"){sortBy="titledesc"}else{sortBy="titleasc"}sortPosts(sortBy);displayToc(postFilter)}function toggleDateSort(){if(sortBy=="datenewest"){sortBy="dateoldest"}else{sortBy="datenewest"}sortPosts(sortBy);displayToc(postFilter)}function showToc(){if(tocLoaded){displayToc(postFilter);var a=document.getElementById("toclink")}else{alert("Just wait... TOC is loading")}}function hideToc(){var a=document.getElementById("toc");a.innerHTML="";var b=document.getElementById("toclink");b.innerHTML='<a href="#" onclick="scroll(0,0); showToc(); Effect.toggle(\'toc-result\',\'blind\');">?? Display Table of Contents</a> <img src="https://blogger.googleusercontent.com/img/b/R29vZ2xl/AVvXsEiCtLRPi7gDuOeHC-ZH3r5OQSaeirZJRmghZRm6ySU7mxL8Z4kWw30LEW2fXuOZN7Qzag-Vw_nmQmoFCoE4jzVWZCt0OIBsw3GQ82ski_MOpJos3ScG7cRkMxq9efkKaokXoTGvxwS6RfoO/s1600/new_icon.gif"/>'}function looptemp2(){for(var a=0;a<numberfeed;a++){document.write("<br>");document.write('Post Link : <a href="'+postUrl[a]+'">'+postTitle[a]+"</a><br>");document.write('Read all : <a href="'+postPublished[a]+'">'+postTitle[a]+"</a><br>");document.write("<br>")}};
//]]>
</script>
<script src="http://helplogger.blogspot.com/feeds/posts/default?max-results=9999&amp;alt=json-in-script&amp;callback=bloggersitemap"></script>
After adding the above code, replace http://helplogger.blogspot.com with the address of your blog.

Customization:

- to change the color and font size of categories title, replace the values in red
- to change the color of the links, replace the value in green

Step 4. Click Options on the right side and select Don't allow (hide existing) for the reader's comments

Step 5. Finally, click the Publish button and View the page.

That's all!

The index of the posts is sorted alphabetically and is updated automatically each time a new post is published.
Read more ...


Tuesday, 19 November 2013

Recent Rotating Post Gadget with Excerpt For Blogger

This Javascript code will display the latest posts of any feed with the distinction of having two parts that can be used individually or combined. At the top this widget will show a single post along with the title (link), author, date and a brief summary of its content. In addition, this post will rotate automatically within a list whose number of elements will be decided by us. At the bottom, we'll find a full list with chosen posts that will change the post above when we mouse over them, thus breaking the automatic cycle.

recent posts widget for blogger
Before installing anything, let's see it in action to decide if it does what we want.


Loading...

How to Add Recent Rotating Posts Widget to Blogger


Step 1. Go to Layout > click on Add a Gadget link.


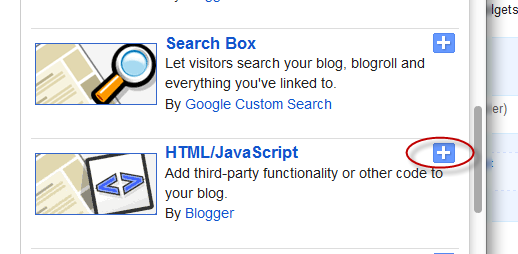
Step 2. From the pop-up windows, choose the HTML/Javascript gadget


Step 3. Paste this code inside the empty box:
<style>
.gfg-root {
width: 100%;
height : auto;
position : relative;
overflow : hidden;
margin: 0 auto;
text-align : center;
font-size: 12px;
border: 1px solid #DBDBDB;
}
.gfg-title {
font-size: 16px;
font-weight : bold;
color : #8A8985;
background:#DBDBDB;
background-repeat: repeat;
line-height : 1.4em;
overflow : hidden;
white-space : nowrap;
padding: 5px;
text-shadow: 0px 2px #fff;
}
.gfg-entry {
background-color: #FFFFFF;
width : 100%;
height : 9.2em;
position : relative;
overflow : hidden;
text-align : left;
margin-top : 3px;
}
.gf-title a {
font-weight: bold;
color: #8B8A86;
font-size: 14px;
}
.gfg-subtitle {
display: none;
}
.gfg-list {
position : relative;
overflow : hidden;
text-align : left;
}
.gfg-listentry {
line-height : 1.5em;
overflow : hidden;
white-space : nowrap;
text-overflow : ellipsis;
padding-left : 15px;
padding-right : 5px;
}
.gfg-listentry-odd {
background-color : #F3F3F3;
border-bottom : 1px dotted #CCCCCC;
padding: 5px;
}
.gfg-listentry-even {
background-color : #F3F3F3;
border-bottom : 1px dotted #CCCCCC;
padding: 5px;
}
.gfg-listentry-odd a{
color: #595959;
padding: 0 0px 0 10px;
}
.gfg-listentry-even a{
color: #242424;
padding: 0 0px 0 10px;
}
.gfg-listentry-highlight {
background: #ffffff;
}
.gfg-listentry-highlight:before {
position: absolute;
left: 0;
content: '\25BA ';
font-size: 14px;
color: #DBDBDB;
}
.gfg-listentry-highlight a {
color: #242424;
}
.gfg-root .gfg-entry .gf-result {
position : relative;
background-color: #ffffff;
width : auto;
height : 100%;
padding-left : 20px;
padding-right : 5px;
}
.gfg-root .gfg-entry .gf-result .gf-title {
font-size: 14px;
line-height : 1.2em;
overflow : hidden;
white-space : nowrap;
text-overflow : ellipsis;
margin-bottom : 2px;
margin-top: 5px;
}
.gfg-root .gfg-entry .gf-result .gf-snippet {
height : 3.8em;
color: #000000;
margin-top : 3px;
}
.clearFloat {
clear : both;
}</style>
<script src="http://www.google.com/jsapi" type="text/javascript"></script><script src="http://www.google.com/uds/solutions/dynamicfeed/gfdynamicfeedcontrol.js" type="text/javascript"></script>
<script type="text/javascript">
function showGadget() {var feeds = [{title:'List',url:'http://helplogger.blogspot.com/feeds/posts/default?redirect=false&start-index=1&max-results=10'},];
new GFdynamicFeedControl(feeds, 'feedGadget',{title: 'Latest Posts', numResults : 10, displayTime : 5000, hoverTime : 500});} google.load("feeds", "1");
google.setOnLoadCallback(showGadget);
</script>
<div id="feedGadget">Loading...</div>

Customizations:

The url in blue is the feed address. Obviously, the http://helplogger.blogspot.com address should be replaced with yours.

Next is start-index=1. This number indicates which post will appear first on the list. By default it is the latest post published on our blog, so if we want to begin displaying older posts, we need to change the 1 value.

max-results=10 indicates the maximum number of posts that we will be reading from the feed, beginning from the one that we have set up before in the start-index=1. This number always needs to be equal or greater to what we should see later and its purpose is to set the number of posts that will be shown in the gadget. The easy thing would be to put 500 in order not to fail, but the higher the number is, the longer the gadget will take to load, so it's better to adjust to what we need to show.

Finally here are some other parameters of the script:

title: 'Latest Posts', is the widget's title that appears on top.
numResults: 10, number of posts that will show in the list
displayTime: 5000, the delay time between posts in the rotator (in milliseconds)
hoverTime: 500, minimum time for an item in the list to be displayed at the top.

If you want to hide the list and show only the posts, then change this part:
.gfg-list {
position : relative;
overflow : hidden;
text-align : left;
}
 to :
.gfg-list {
display:none;
}
and if you want to display only the list, then change this part:
.gfg-entry {
background-color: #FFFFFF;
width : 100%;
height : 9.2em;
position : relative;
overflow : hidden;
text-align : left;
margin-top : 3px;
}
to:
.gfg-entry {
display: none; }

Step 4. Save the gadget and you're done. Enjoy!
Read more ...


Friday, 20 September 2013

4 Different Styles For the Popular Posts Widget

Blogger allows us to easily add a "Popular Posts" widget, that we select from its list of gadgets, and we can do that by going to the "Layout" of our Blog.

This gadget, as the name implies, shows which are the most visited blog posts, and you can set it to display the info you want in four possible combinations: (1) only the title of the post, (2) a thumbnail of the image and the post title, (3) post title with a summary, and (4) post title with a thumbnail and a post snippet.

This is an element that you shouldn't miss in your blog because it encourages your visitors to navigate through your content, which can result in higher income if you're monetizing your blog because it would generate an increase in the number of pages visited, and in turn, can attract the users' interest to subscribe to the blog and to read interesting content.

Preliminary steps: Add the gadget, if you haven't done it yet.


1. Select the "Layout" tab and add the "Popular Posts" gadget in that part of your blog you want to appear, such as in your sidebar, by clicking on "Add a Gadget".

2. Configure the widget to show only the post titles. You can do this by clicking on the "image thumbnail" and "snippet" checkboxes, as shown in the following image.

3. After configuring the widget, save the changes by clicking on Save, and then Save arrangement.

How to add the CSS to create the style of the Popular Posts widget


1. Choose a style, then copy the CSS that appears below the image that shows the style.

2. Select the "Template" tab, then click on Customize > Advanced > Add CSS and then paste the CSS style that you like the most.

blogger tutorials
3. Once you add the CSS, Save changes by clicking on the "Apply to Blog" button.

And that's it! I've already customized the popular posts widget, when it only shows post titles.

Styles

Here is the CSS of each style, just choose the one you like the best and put it on your blog. You can see each of these styles in action in the following demo blog:

http://demo-blog343.blogspot.com

Style 1:
blogger gadgets, blogger widgets
#PopularPosts1 h2{
padding:7px 0 3px 0;
width:100%;
margin:0;
font-size:1.3em;
text-indent:-12px;
font-size:18px;
text-align:center;
color: #000; /* Color of the widget's title */
}
#PopularPosts1 ul{
list-style:none;
counter-reset:li;
padding:8px 0px 1px;
left:-8px;
width:290px;
}
#PopularPosts1 li{
position:relative;
margin:0 0 10px 0;
padding: 3px 2px 0 7px;
left:-5px;
width:285px;
border:1px solid #ccc;
}
#PopularPosts1 ul li:before{
content:counter(li);
counter-increment:li;
position:absolute;
display:block;
top:-5px;
left:-5px;
font-size:18px;
width:14px;
margin:0 0 10px 0;
padding:4px 4px 4px 3px;
color:#333;
text-align:left;
background:#E8E8E8;
text-indent:2px;
}
#PopularPosts1 ul li:after{
content:"";
position:absolute;
top:-5px;
left:15px;
width: 0px;
height: 0px;
border-top:5px outset transparent;
border-left:5px solid #aeaeae;
}

#PopularPosts1 ul li a{
font-size:17px; /* Font size of the links */
color:#444; /* Color of the links */
font-style: italic;
margin-left:17px;
display:block;
min-height:25px;
text-decoration:none;
padding:0 4px 3px 0;
}
#PopularPosts1 ul li:hover{
background:#f9f9f9;
border:1px solid #aaa;
}
#PopularPosts1 ul li a:hover{
color:#0174DF;
}

Style 2:
blogger gadgets, blogger widgets
#PopularPosts1 h2{
position:relative;
padding:8px 10px 6px 10px;
width:100%;
margin:0;
font-size:17px;
background: #bada55;
color:#222; /* Color of the widget's title */
text-align:center;
}
#PopularPosts1 h2:before{
position:absolute;
content:"";
top:-6px;
right:-5px;
width: 0px;
height: 0px;
border-bottom:24px outset transparent;
border-top:24px outset transparent;
border-right:24px solid #fff; /* Color of the triangle */
}

#PopularPosts1 h2:after{
position:absolute;
content:"";
top:-7px;
left:-5px;
width: 0px;
height: 0px;
border-bottom:24px outset transparent;
border-top:24px outset transparent;
border-left:24px solid #fff; /* Color of the triangle */
}

#PopularPosts1 ul{
list-style:none;
counter-reset:li;
padding:10px;
left:-8px;
width:100%;
}

#PopularPosts1 li{ /* Styles of each element */
width:100%;
position:relative;
left:0;
margin:0 0 1px 12px;
padding:4px 5px;
}

#PopularPosts1 ul li:before{ /* style of the numbers */
content:counter(li);
counter-increment:li;
position:absolute;
top:2px;
left:-23px;
font-size:35px; /* Font size of the numbers */
width:20px;
color:#666; /* Color of the text */
}
#PopularPosts1 ul li a{
display:block;
position:relative;
left:-30px;
width:100%;
margin:0;
padding: 9px 3px 10px 29px;
font-size:15px; /* Font size of the links */
font-style: italic;
color:#333; /* Color of the links */
text-decoration:none;
transition: all .1s ease-in-out;
}
#PopularPosts1 ul li a:hover{
color:#3366ff;
margin-left:3px;
}

Style 3:
blogger gadgets, blogger widgets
#PopularPosts1 h2{
position:relative;
right:-2px;
padding:8px 63px 6px 17px;
width:100%;
margin:0;
font-size:16px;
background:#C00000; /* Background color */
color:#f2f2f2; /* Color of the widget's title */
text-align:left;
text-indent:18px;
}
#PopularPosts1 h2:before{
position:absolute;
content:"";
top:33px;
right:0px;
width: 0px;
height: 0px;
border-bottom:12px outset transparent;
border-left:12px solid #800000;
}
#PopularPosts1 h2:after{
position:absolute;
content:"";
top:-6px;
left:-5px;
width: 0px;
height: 0px;
border-bottom:24px outset transparent;
border-top:24px outset transparent;
border-left:24px solid #fff;
}
#PopularPosts1 ul{
list-style:none;
counter-reset:li;
padding:10px;
left:-8px;
width:100%;
}
#PopularPosts1 li{
width:100%;
position:relative;
left:0;
margin:7px 0 16px 12px;
padding:10px  4px 0 5px;
}
#PopularPosts1 ul li:before{
content:counter(li);
counter-increment:li;
position:absolute;
top:-2px;
left:-20px;
font-size:33px;
width:20px;
color:#888888;
}

#PopularPosts1 ul li a{
display:block;
font-size:14px; /* Font size of the links */
color: #666; /* Color of the links */
text-decoration:none;
transition: all .1s ease-in-out;
}
#PopularPosts1 ul li a:hover{
color:#3366FF;
margin-left:3px;
}

Style 4:
blogger gadgets, blogger widgets
#PopularPosts1 h2{
padding:8px 10px 3px 0;
width:100%;
margin:0;
font-size:16px;
position:relative;
left:-20px;
display:block;
border-bottom:2px solid #ccc;
}
#PopularPosts1 ul{
list-style:none;
counter-reset:li;
padding:10px;
width:100%;
}
#PopularPosts1 li{ /* Styles of each element */
width:100%;
position:relative;
left:0;
margin:0 0 6px 10px;
padding:4px 5px;
}
#PopularPosts1 ul li:before{ /* Style of the numbers */
content:counter(li);
counter-increment:li;
position:absolute;
top:3px;
left:-39px;
font-size:21px;
width:28px;
height:28px;
border-radius: 50%;
color:#777; /* Text color */
border: 2px solid #ddd; /* Rounded border color */
padding:0;
text-indent:9px;
}
#PopularPosts1 ul li a{
display:block;
position:relative;
left:-45px;
width:100%;
margin:0;
min-height:28px;
padding: 5px 3px 3px 39px;
color:#333; /* color of the links */
text-decoration:none;
font-size:14px; /* Font size of the links */
font-style: italic;

}
#PopularPosts1 ul li a:hover{
color:#3366ff;
margin-left:3px;
}

Final Notes

All the CSS is valid. I just have to mention that the numbering is not visible in Internet Explorer 7, since that version of the browser does not support properties that make the numbers appear. For example in the 4th style, the circles look squared in IE8 and earlier versions since, these versions do not support a property that makes them look as circles.

Fonts will be inherited from the template, since they have not been declared in the CSS.
Read more ...


Monday, 4 June 2012

How to Create Drop Caps (Big First Letters) in Blogger/Blogspot

Here's another way you can customize your Blog. In this case, your Posts and Comment's first letter. The effect is a large first letter stretching down three or four lines with the text wrapped around. The drop cap letter can also use a different font and can be a different color to the rest of the text. You often see this style in newspapers, literature, magazines. In this tutorial i will show you how to apply automatically Magazine text style in Blogger Posts and Comments. So let's start adding it!

-> Add Drop Caps For Blogger Posts

drop caps, blogger blogspot, tutorials

-> Add Drop Caps For Blogger Comments

drop caps, first letter, blogger

Big First Letter for your Blogger / Blogspot Posts

Step 1.
  •  If you are using the old Blogger interface:
Go to Dashboard - Design - Edit HTML - Expand Widget Template (make a backup)
  • If you are using the new Blogger interface:
Go to Dashboard - Template - Edit HTML - Proceed - Expand Widget Template (make a backup)

Step 2. Search (CTRL + F) for this piece of code:

]]></b:skin>

Step 3. Just above it, add the following:

.capital:first-letter {
float: left;
display: block;
font-family: Times, serif, Georgia;
font-size: 40px;
color: #000000;
margin:0px 5px 0 0;
padding:0 0 0 10px;
}

Customize:

Color - change the color highlighted in blue with the value of your desired color
Size - to change the letter size, increase/decrease the value highlighted in pink.

Step 4. Now search for this code:

<data:post.body/>

Step 5. Then immediately before and after add the red fragments you see in the example below:

 <div class='capital'><data:post.body/></div>

Step 6. Save your template.

Important! If the above code is not working, add one of following codes from this example:


<p class="capital"><data:post.body/></p>

Or

<span class="capital"><data:post.body/></span>


Big First Letter For Blogger/Blogspot Comments

Step 1. Log in to your Blogger account, then go to Design (Layout) >> Edit HTML >> check the "Expand Widget Templates" box

Step 2. Search (CTRL + F) for this piece of code (if you have already added this code, skip step 2 & 3):

]]></b:skin>

Step 3. Add the following code just above ]]></b:skin>:

.capital:first-letter {
float: left;
display: block;
font-family: Times, serif, Georgia;
font-size: 40px;
color: #000000;
margin:0px 5px 0 0;
padding:0 0 0 10px;
}

Customize:

Color - change the color highlighted in blue with the value of your desired color
Size - to change the letter size, increase/decrease the value highlighted in pink.

Step 4. Then Search for this piece of code:

<data:comment.body/>

Step 5. Add the red codes before and after <data:comment.body/> as you can see in my example below:

<p class="capital"><data:comment.body/></p>

Step 6. Save your Template.

That's it! Now you have a cool drop cap first letter on your blog.
If you have any question, leave a comment below!
Read more ...


Saturday, 5 May 2012

Show Blogger Image only in Homepage and Hide it in Post Page


To hide images/pictures from our blogger posts and to make them appear only in homepage, we will have to add just a small piece of CSS code in our template and then use the class "hidepic" each time we want to hide an image.

Just follow the next steps:

Step 1. Go to Dashboard - Template - Edit HTML ( click on Proceed button )


 Step 2. Select "Expand Widget Template" (make a backup)

     Step 3. Find (CTRL + F) this code in your template:

        }]]></b:skin>

    Step 4. Copy and paste the following code just below it

    <b:if cond='data:blog.pageType != &quot;index&quot;'>
    <style>
    .hidepic{
    display: none;
    }
    </style>
    </b:if>

    Step 5. Save the Template.

    Now everytime you create a post, firstly add the pic you want to hide and then switch to HTML tab where you'll see the HTML code of the image you have added that will look something like this:

    <div class="separator" style="clear: both; text-align: center;">
    <a href="https://blogger.googleusercontent.com/img/b/R29vZ2xl/AVvXsEiDZqpo6701Tjvntbnzm3oUlyWwbsGkJmM60paf7UVr6967cov4Cp2PlxTNVzjKyTSpfb8N4PxXbaxAKEZS4V_rOQKF52bpl5fsipTffCo6WSP4cjU5acTSv8YHD1yR0_GoYw_qrlV-9nI/s1600/fire_bird_by_fhrankee-d32af8v.png" imageanchor="1" style="margin-left: 1em; margin-right: 1em;"><img border="0" height="320" src="https://blogger.googleusercontent.com/img/b/R29vZ2xl/AVvXsEiDZqpo6701Tjvntbnzm3oUlyWwbsGkJmM60paf7UVr6967cov4Cp2PlxTNVzjKyTSpfb8N4PxXbaxAKEZS4V_rOQKF52bpl5fsipTffCo6WSP4cjU5acTSv8YHD1yR0_GoYw_qrlV-9nI/s320/fire_bird_by_fhrankee-d32af8v.png" width="320" /></a></div>

    Note: it should be at the exact location where your image has been added 
    (if the image is at the middle of the text, then the code should be found at the middle)

    Step 6. Replace "separator" with "hidepic" - see the screenshot below:


    If you need more help, please leave a comment below.

    Read more ...


    Friday, 4 May 2012

    Recent Posts Widget with Thumbnails for Blogger/Blogspot

    A few days ago, I've posted a tutorial about How To Add A Simple Recent Posts Widget but today I want to present to you a very nice Recent Posts widget that comes along with posts thumbnails and post summary as well. If you want to know how to add this Recent Posts widget/gadget to your Blogger blog, then follow the steps below:

    recent posts, blogger widgets

    How to Add the Recent Posts Widget to Blogger

    Step 1. Go To Blogger > Layout and click on "Add a Gadget" link


    Step 2. From the pop-up window, scroll down and choose HTML/JavaScript


    Step 3. Paste inside the empty box, the following code:

    <div class="eggTray">
    <script src="http://helplogger.googlecode.com/svn/trunk/listbadge.js">{"pipe_id":"1a6640e2a78b2c6e736f2220529daae5","_btype":"list",
    "pipe_params":{"URL":"YOUR-BLOG/SITE-URL/feeds/posts/default"},
    "hideHeader":"false","height":"500","count": 8 }</script>
    <div style="font-family: arial, sans-serif; font-size: 9px;" class="ycdr"><a href="http://helplogger.blogspot.com/2012/05/recent-posts-widget-with-thumbnails-for.html" target="_blank" title="Grab this widget">Recent Posts Thumbnails</a> <a href="http://helplogger.blogspot.com/" target="_blank">Blogger Widget</a></div><noscript>Your browser does not support JavaScript!</noscript></div>
    <style type=text/css>
    .eggTray {margin:10px 0px;padding:0px;}
    .ybr li  {border-bottom:0px #cccccc dotted; padding:0px 0px 10px 0px!important;}
    .pipesTitle {padding-top:0px;}
    .pipesDescription {display:true;}
    .ycdr {background:transparent url(https://blogger.googleusercontent.com/img/b/R29vZ2xl/AVvXsEgIO9sIRsHlEOm3ebF6L7XtJctOWCqU0fix556tGx-t2Ch4vfA_0ABZxQdA2YDSNQ-a8-GYbM3NIvhKxMb33r_gJwsRpkey6d2zfdk4XXNyafi04We8-G8R1Xb_H6iCXzyvQUjRey1gRKA/s1600/logo.png) 0px 0px no-repeat; padding: 1px 0px 0px 19px; height:14px; margin: 4px 0px 0px 0px;line-height:14px;}
    .ycdr, .ycdr a {color:#999999;}
    .widget .popular-posts ul {padding-left:0;}
    </style>

    Step 4. Change YOUR-BLOG/SITE-URL with the url address of your site/blog (ex: http://helplogger.blogspot.com) and look to have no forward slash symbol "/" at the end of your url

    Note:
    • To disable the scroll bar, remove the number 500
    • By default, this widget is set to display a maximum of 8 recent posts. To change this number, replace the number 8 with the number of posts desired
    • if you want only the posts titles to appear, change true to none and "0" from padding-top:0px with 10

    Step 5. Save your widget. And you're done!

    If you need more help, leave your comment below.

    Read more ...


    Saturday, 28 April 2012

    Simple Recent Posts Widget for Blogger/Blogspot

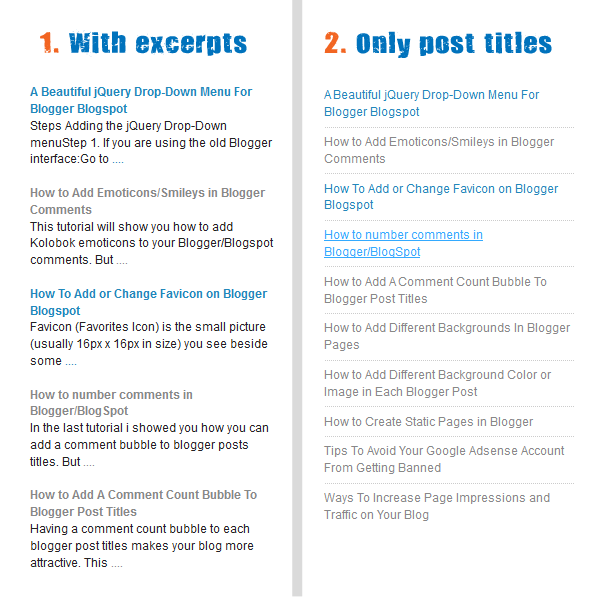
    The main advantage on this Recent Posts widget is that it will show not only post titles but also post excerpts or snippets and it's easy to customize/ apply different style on it. To style it into your own design, you just have to modify the CSS style - you can change the link or background color, the size and color of text/links.

    What you can do with this widget:
    • display post titles only
    • change the number of posts
    • change the number of characters of the post snippet/excerpt
    • show the post dates

    See the screenshot below:

    How to add Recent Posts Widget to Blogger

    Step 1. Log in to your Blogger Dashboard, then go to Layout and click on Add a Gadget link


    Step 2. From the pop-up window, scroll down and choose HTML/JavaScript


    Step 3. Select & Copy the code from one of the options below and paste it into the new HTML/JavaScript:

    Option 1: Recent posts widget with snippets

    <div id="hlrpsa">
    <script src="http://helplogger.googlecode.com/svn/trunk/recent-posts-with-snippets.js">
    </script>
    <script>
    var numposts = 5;var showpostdate = false;var showpostsummary = true;var numchars = 100;var standardstyling = true;
    </script>
    <script src="http://your-blog.blogspot.com/feeds/posts/default?orderby=published&amp;alt=json-in-script&amp;callback=showrecentposts">
    </script></div>
    <div id="rpdr" style="font-family: arial, sans-serif; font-size: 9px;">
    <a href="http://helplogger.blogspot.com/2012/04/recent-posts-widget-for-bloggerblogspot.html" target="_blank" title="Grab this Recent Posts Widget">Recent Posts Widget</a> by <a href="http://helplogger.blogspot.com" title="Recent Posts Widget">Helplogger</a></div>
    <noscript>Your browser does not support JavaScript!</noscript>
    <style type="text/css">
    #hlrpsa a {color: #0B3861; font-size: 13px;} #rpdr {background: url(https://blogger.googleusercontent.com/img/b/R29vZ2xl/AVvXsEg3dFvTwwtWBHf9Jycsob-tqewhfyYkyetHWSsoOmmKYsSOhJgBanhEQsemggioUxyofbxJWUKP6tiuifDKhXCUq5VueHyimVd-CDBfw1h2L1clIqBdhWz5NWgwbvD5hiCQGyRjzuaUkYFZ/s1600/blogger.png) 0px 0px no-repeat; padding: 1px 0px 0px 19px; height:14px; margin: 5px 0px 0px 0px;line-height:14px;}
    #rpdr, #rpdr a {color:#808080;}
    #hlrpsa { color: #999999; font-size: 11px; border-bottom:1px #cccccc dotted; margin-top:-10px; padding-bottom:10px;}
    .hlrps a {font-weight:bold; }
    .hlrpssumm {}
    </style>

    Option 2: Recent Posts Widget Showing Post Titles Only

    <div id="hlrpsb">
    <script style="text/javascript" src="http://helplogger.googlecode.com/svn/trunk/recent-posts-with-titles-only.js"></script>
    <script style="text/javascript">var numposts = 10;var showpostdate = false;var showpostsummary = false;var numchars = 100;var standardstyling = true;</script>
    <script src="http://your-blog.blogspot.com/feeds/posts/default?orderby=published&alt=json-in-script&callback=showrecentposts"></script></div>
    <div style="font-family: arial, sans-serif; font-size: 9px;" id="rpdr"><a href="http://helplogger.blogspot.com/2012/04/recent-posts-widget-for-bloggerblogspot.html" title="Grab this Recent Posts Widget" target="_blank">Recent Posts Widget</a> by <a href="http://helplogger.blogspot.com" title="Recent Posts Widget">Helplogger</a></div><noscript>Oops! Make sure JavaScript is enabled in your browser.</noscript>
    <style type=text/css>
    #hlrpsb a {color: #0B3861; font-size: 13px;} #rpdr {background: url( https://blogger.googleusercontent.com/img/b/R29vZ2xl/AVvXsEg3dFvTwwtWBHf9Jycsob-tqewhfyYkyetHWSsoOmmKYsSOhJgBanhEQsemggioUxyofbxJWUKP6tiuifDKhXCUq5VueHyimVd-CDBfw1h2L1clIqBdhWz5NWgwbvD5hiCQGyRjzuaUkYFZ/s1600/blogger.png ) 0px 0px no-repeat; padding: 1px 0px 0px 19px; height:14px; margin: 5px 0px 0px 0px;line-height:14px;}
    #rpdr, #rpdr a {color:#808080;}
    .bbrecpost2 {
    padding-top:6px;
    padding-bottom:6px;
    border-bottom: 1px #cccccc dotted; }
    </style>

    Step 4.
    • Change 5 (option 1) and 10 (option 2) with the number of posts you want to display. 
    • Change false to true if you want the posts dates to appear 
    • Change 100 (option 1) if you want more characters to be displayed.
    • To change the color and font size of the links, modify the values in blue (links) and violet (font-size)
    • To change the style of posts summary, modify the values in green (color) and orange (font size)
    • Replace the your-blog text with the name of your blog or if you have a custom domain change all the bolded line with your address like in this example:
    http://www.your-site.com/feeds/posts/default....

    Step 5. Save your widget. And that's it! Enjoy!

    If you need any help, leave a comment below.
    And if you liked this post, please consider sharing it. Thanks.

    Read more ...


    Sunday, 15 April 2012

    How to Add Different Background Color or Image in Each Blogger Post

    When you have multiple authors on a blog and want to make a specific post stand-out, then you can change your posts background color or place a background image behind them, each time is needed. Therefore, this tutorial will show you how to style each post differently by adding some codes in your Blogger posts. (this won't take effect if you have the read more function enabled on your blog)


    How to Change the Color of the Post Background

    When you create a post, switch to HTML, near the Compose tab and add the following code just at the beginning and at the end of your post content.

    <div style="background-color: #DCC368; padding: 5px 8px 5px 8px;">
    Your text goes here...
    </div>

    • add the red line at the BEGINNING of your post.
    • add the div tag in blue at the END of your post.
    • replace the part in green with your own color (search for color's hex value)
    • "Your text here...." is where the Post content goes

    It's done by wrapping your Post content into a "div" element. You can apply this setting anytime to your already published posts as well or you can change/remove it later.

    Here's the example of the placed code in the Post Edit box:
    blogger posts color, backgrounds, blogger tricks

    How to Add a Background Image in a Blogger Post

    Add the following code just at the beginning and end of your post content.

    <div style="background-image: url(IMAGE-URL-HERE); background-repeat: no-repeat; ">
    Your text goes here...
    </div>

    • in green, you need to paste the URL address of your hosted picture (use Photobucket, Tinypic etc.)
    • the red line has to be added at the beginning of your post.
    • the blue part has to be added where your post ends.
    • "Your text here...." is where your Post content should be

    Now click Publish and you are done.

    Read more ...


    Wednesday, 11 April 2012

    How to Replace Older Posts and Newer Posts Links with Blogger Post Titles

    If you have ever visited a WordPress blog, you might have noticed that the blog pager on these blogs displays the actual post titles, not just links to the older and newer posts that you find at the bottom of your Blogger blog. This links are parts of the so-called blog pager which helps readers navigate between pages and posts.

    If you want to increase your page impressions, one of the ways is to replace the older/newer posts links with the Blogger post titles.

    How To Add Post Titles Instead of Older Post/Newer Post Link

    Step 1. Log in to Blogger, go to Layout and click on "Add A Gadget" link


    Step 2. From the pop-up window, choose "HTML/JavaScript"


     Step 3. Paste the following code into the empty field of the HTML/JavaScript gadget:

    <script type="text/javascript" src="http://ajax.googleapis.com/ajax/libs/jquery/1.4.2/jquery.min.js"></script>
    <script type="text/javascript">
    var olderLink = $("a.blog-pager-older-link").attr("href");
    $("a.blog-pager-older-link").load(olderLink+" h3:first", function() {
    var olderLinkTitle = $("a.blog-pager-older-link:first").text();
    $("a.blog-pager-older-link").text(olderLinkTitle);
    });
    var newerLink = $("a.blog-pager-newer-link").attr("href");
    $("a.blog-pager-newer-link").load(newerLink+" h3:first", function() {
    var newerLinkTitle = $("a.blog-pager-newer-link:first").text();
    $("a.blog-pager-newer-link").text(newerLinkTitle);
    });
    </script>

    Note: The line in red is for acquiring jQuery framework. If you have acquired jQuery in your template, then you can just delete this part.

    Step 4. Now Save the Widget and drag it under the Blog Posts section.


    Step 5. Click on Save arrangement.


    Now view your blog and see the older/newer posts link, replaced with your post titles.

    For any questions, leave a comment below.


    Read more ...


    Sunday, 8 April 2012

    Add a Popular Posts Gallery just above your Blogger posts

    The most strong and popular web design trend over last couple of years is a sliding horizontal panels also known as Sliders or Carousels. It's a very effective method to increase the web site usability and engage the user. This widget shows the most popular 10 posts on your blog just above your Blogger posts. You can see the Demo on my blog.
    Let's start adding it

    Before adding it you should know that this widget is not fully compatible with all templates, so please make a backup before making any changes to your blogger template. Now, follow these steps:

    1. If you are using the old Blogger interface: 
    • Go to Dashboard - Design - Edit HTML - (make a backup) Expand Widget Template 
    If you are using the new Blogger interface: 
    • Go to Dashboard - Template - Edit HTML - Proceed - (make a backup) Expand Widget Template
    2. Search (CTRL + F) for this piece of code:

    ]]></b:skin>

    3. Just above/before it, add the following code:

    #gallery{position:relative;margin:0 35px 20px;width:590px;height:126px;background:#ffffff}
    #gallery .belt{position:absolute;top:0;left:0;list-style-type:none}
    #gallery .panel{float:left;margin:20px;width:84px;height:86px;background:url(https://blogger.googleusercontent.com/img/b/R29vZ2xl/AVvXsEgOU5n6DS8dCdZgIhf7OXADlciK4yEqD7jGaYp36icwkNpeYgFwFIVO4qfqjBXs3SrDrQ7M-hezpe3dLCuCMK6wMpDwomaWWr63lb8pywovVMBCXYbBwIQeKFK088jlNb31ghE-MdAkm1gF/s1600/bg-slider.png) bottom center no-repeat;overflow:hidden}
    #gallery .panel img{float:left;border:1px solid #DDD;margin:5px;width:72px;height:72px;background:#FFF;padding:0px}
    #gallery .panel img:hover{filter:alpha(opacity=50);-moz-opacity:0.5;-khtml-opacity:0.5;opacity:0.5}

    Note: you can adjust the size of gallery, changing the values in red (590 and 126).

    4. Now search for the following piece of code:

    </head>


    5. Just above/before it, add this code:

    <script src='http://ajax.googleapis.com/ajax/libs/jquery/1.4.2/jquery.min.js' type='text/javascript'/>
    <script src='http://helplogger.googlecode.com/svn/trunk/auto-slider.js' type='text/javascript'/>
    <script type='text/javascript'>
    //<![CDATA[
    stepcarousel.setup({
    galleryid: "gallery",
    beltclass: "belt",
    panelclass: "panel",
    autostep: {enable:true, moveby:1, pause:6000},
    panelbehavior: {speed:500, wraparound:true, persist:true},
    defaultbuttons: {enable: true, moveby: 2, leftnav: ["https://blogger.googleusercontent.com/img/b/R29vZ2xl/AVvXsEjIg6kLRP9y4jaNIPn5nWIOJYFQc0MLdCHaG-7j4v7TbfAGPGCeERAnlaf2NsWX30sfr2nIpCmO-7602cn-BE7zkWbNf8S3FQjmCZgYwN-KkrT5JAPtbxjFjOBy-CvjRq-Ks5eJtv33WCx5/s1600/prev.png", -40, 36], rightnav: ["https://blogger.googleusercontent.com/img/b/R29vZ2xl/AVvXsEjRVE11X6dfVQmOOKa1PpmV1DPFaWRqa1O8VmqRfsSJCOJv6pp1icJuaBs7ljSzBZRJy3KVIbPnEQ7SmnW21lyyWSu8EkfnpQDg0dt-sVlVbP873YM9W_Fbcbxa7uFNgnk14-iBbTQk6TMd/s1600/next.png", 2, 36]},
    contenttype: ["external"]
    })
    //]]>
    </script>

    Next thing to do is to place the widget just above the blogger posts.

    6. Search for this code:

    <b:section class='main' id='main' showaddelement='yes'>

    ...or if you can'find it, search for this one:

    <b:section class='main' id='main' showaddelement='no'>

    7. Just below it, add the following code:

    <b:widget id='PopularPosts2' locked='false' title='Popular Posts' type='PopularPosts'>
    <b:includable id='main'>
    <b:if cond='data:blog.url == data:blog.homepageUrl'>
    <div style='margin-top:20px;margin-bottom:70px;margin-left:-20px;'>
      <div id='gallery'>
       <ul class='belt'>
        <b:loop values='data:posts' var='post'>
         <li class='panel'>
          <b:if cond='data:showThumbnails == &quot;false&quot;'>
           <b:if cond='data:showSnippets == &quot;false&quot;'>
            <a expr:href='data:post.href' expr:title='data:post.title' rel='bookmark'><data:post.title/></a>
           <b:else/>
            <div class='item-title'>
             <a expr:href='data:post.href' expr:title='data:post.title' rel='bookmark'><data:post.title/></a>
            </div>
            <div class='item-snippet'>
             <data:post.snippet/>
            </div>
           </b:if>
          <b:else/>
           <a expr:href='data:post.href' expr:title='data:post.title' rel='bookmark'>
            <b:if cond='data:post.thumbnail'>
             <img expr:alt='data:post.title' expr:src='data:post.thumbnail'/>
            <b:else/>
             <img alt='no image' src='https://blogger.googleusercontent.com/img/b/R29vZ2xl/AVvXsEjjYe7WwHE6guq16NiUl0rQubjVDBoyJp_oR2E7nZS36-YozDVhOm4OEkeRx4EjdbSBWUMfJG9DiuM0Q8d0Ae6p8Wh8syULRUK_yMTM4USuAfH_25G2NeMA0sf-0A4fIu8HnXwv4jDpu5x0/s1600/no-image.PNG'/>
            </b:if>
           </a>
          </b:if>
         </li>
        </b:loop>
       </ul>
      </div></div></b:if>
     </b:includable>
    </b:widget>

    Note: delete the fragments of code in blue if you want this widget to be displayed in posts pages also.

    8. Preview and if everything is ok, Save the Template.
    Read more ...


    How to add an image next to Blogger Post Title

    blogger posts, gadgets for blogger, blogger tutorials

    It has often been said that a picture says a thousand words, so in the struggle for the attention of the reader, we can add a picture or an icon to our post title, as I have put in the title of the post in the screenshot above.

    Show Image Icon before Blogger Post Title

    Step 1:

    First thing first you have to do is to prepare an image. After that you'll need a direct link to an image before you proceed further. You can upload it to tinypic.com and copy the URL located in the Direct Link for Layouts box. Also, make sure your image is sized appropriately. You don't want to see a huge image next to your post title.

    Step 2: Go to Dashboard - Template - Edit HTML - Proceed if needed
      Step 3. Click anywhere inside the code area to find (using CTRL + F) the following code:
      <b:includable id='post' var='post'>
      Step 4. After you found it, click on the left arrow next to it to expand the widget's code


      Step 5. Then delete it until you reach to <div class='post-header'>:
                    <b:includable id='post' var='post'>
        <div class='post hentry' itemprop='blogPost' itemscope='itemscope' itemtype='http://schema.org/BlogPosting'>
          <b:if cond='data:post.firstImageUrl'>
            <meta expr:content='data:post.firstImageUrl' itemprop='image_url'/>
          </b:if>
          <meta expr:content='data:blog.blogId' itemprop='blogId'/>
          <meta expr:content='data:post.id' itemprop='postId'/>

          <a expr:name='data:post.id'/>
          <b:if cond='data:post.title'>
            <h3 class='post-title entry-title' itemprop='name'>
            <b:if cond='data:post.link'>
              <a expr:href='data:post.link'><data:post.title/></a>
            <b:else/>
              <b:if cond='data:post.url'>
                <b:if cond='data:blog.url != data:post.url'>
                  <a expr:href='data:post.url'><data:post.title/></a>
                <b:else/>
                  <data:post.title/>
                </b:if>
              <b:else/>
                <data:post.title/>
              </b:if>
            </b:if>
            </h3>
          </b:if>
      The code to be deleted:


      Step 6:

      Paste the following code in the place of the deleted code in Step 5:
      <b:includable id='post' var='post'>
        <div class='post hentry' itemprop='blogPost' itemscope='itemscope' itemtype='http://schema.org/BlogPosting'>
          <b:if cond='data:post.firstImageUrl'>
            <meta expr:content='data:post.firstImageUrl' itemprop='image_url'/>
          </b:if>
          <meta expr:content='data:blog.blogId' itemprop='blogId'/>
          <meta expr:content='data:post.id' itemprop='postId'/>

          <a expr:name='data:post.id'/>
          <b:if cond='data:post.title'>
            <table><tr>
              <td class='posttitle'>
                 <img src='IMAGE-URL'/></td>
              <td><h3 class='post-title entry-title' itemprop='name'>
            <b:if cond='data:post.link'>
              <a expr:href='data:post.link'><data:post.title/></a>
            <b:else/>
              <b:if cond='data:post.url'>
                <b:if cond='data:blog.url != data:post.url'>
                  <a expr:href='data:post.url'><data:post.title/></a>
                <b:else/>
                  <data:post.title/>
                </b:if>
              <b:else/>
                <data:post.title/>
              </b:if>
            </b:if>
            </h3>
              </td>
              </tr></table>
           
            <style>
              h3.post-title {
                margin: 0px !important;
              }
            </style>
         
          </b:if>

      Step 7:

      Replace the IMAGE-URL text in blue color from above with the URL address of your image (the one that you've gotten from Step 1).

      Step 8: Save the Template and that's it! Enjoy :)
      Read more ...


      Poll