Just a few days ago, Blogger introduced a new widget. It is about a contact form that you can add to your blog easily. It is very basic, because - at least for now, does not permit incorporating files or send anything other than plain text.
The contact form for Blogger has the following features:
 The design is simple and the text colors inherit the section where you add it. At the moment, this widget has no configuration options and is not available for dynamic views.

As the background is transparent, the form will integrate well, aesthetically speaking, but nevertheless it is easy to modify using Style Sheets (CSS) to the appropriate selectors. Here's an example:

To add this style, go to Template > Edit HTML, click on the sideways arrow next to <b:skin>...</b:skin> and paste the code just above ]]></b:skin> (press CTRL + F to find it):

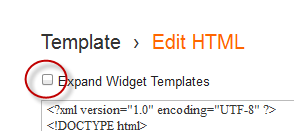
First step is to add the Contact Form gadget (Layout) and second, to edit the template (Template > Edit HTML) to remove most of the gadget. You have to search for the id "ContactForm", expand the widget by clicking on the black arrow on the left (same with the includable) and then delete the part that I have colored in red (see below):

Part to be removed:
After you have saved the template, go to Pages and paste the following code into a new blank page with the title you want:
Messages will be sent to the same email that you have registered in Blogger.
Here's a demo page where you can test it (it is an account that I don't use, so don't expect reply).
That's it! If you have any questions or comments please post below.
Read more ...
The contact form for Blogger has the following features:
- Field for the user name
- Field for email
- Field for the message (textarea)
- Submit Button
Screenshot
How to Add Contact Form to Blogger
To add it to your blog, just select the Layout tab, then click on Add a gadget in the section you want to show, for example, in the sidebar. Then, select the More gadgets tab and add the Contact Form gadget.Styling Contact Form
As the background is transparent, the form will integrate well, aesthetically speaking, but nevertheless it is easy to modify using Style Sheets (CSS) to the appropriate selectors. Here's an example:
/* Contact Form Container */
.contact-form-widget {
width: 500px;
max-width: 100%;
margin: 0 auto;
padding: 10px;
background: #F8F8F8;
color: #000;
border: 1px solid #C1C1C1;
box-shadow: 0 1px 4px rgba(0, 0, 0, 0.25);
border-radius: 10px;
}
/* Fields and submit button */
.contact-form-name, .contact-form-email, .contact-form-email-message {
width: 100%;
max-width: 100%;
margin-bottom: 10px;
}
/* Submit button style */
.contact-form-button-submit {
border-color: #C1C1C1;
background: #E3E3E3;
color: #585858;
width: 20%;
max-width: 20%;
margin-bottom: 10px;
}
/* Submit button on mouseover */
.contact-form-button-submit:hover{
background: #4C8EF9;
color: #ffffff;
border: 1px solid #FAFAFA;
}
This is how it will look like after applying the style:
To add this style, go to Template > Edit HTML, click on the sideways arrow next to <b:skin>...</b:skin> and paste the code just above ]]></b:skin> (press CTRL + F to find it):
How To Add Contact Form In A Static Page
First step is to add the Contact Form gadget (Layout) and second, to edit the template (Template > Edit HTML) to remove most of the gadget. You have to search for the id "ContactForm", expand the widget by clicking on the black arrow on the left (same with the includable) and then delete the part that I have colored in red (see below):

Part to be removed:
<b:widget id='ContactForm1' locked='false' title='Contact Form' type='ContactForm'>
<b:includable id='main'>
<b:if cond='data:title != ""'>
<h2 class='title'><data:title/></h2>
</b:if>
<div class='contact-form-widget'>
<div class='form'>
<form name='contact-form'>
<p/>
<data:contactFormNameMsg/>
<br/>
<input class='contact-form-name' expr:id='data:widget.instanceId + "_contact-form-name"' name='name' size='30' type='text' value=''/>
<p/>
<data:contactFormEmailMsg/> <span style='font-weight: bolder;'>*</span>
<br/>
<input class='contact-form-email' expr:id='data:widget.instanceId + "_contact-form-email"' name='email' size='30' type='text' value=''/>
<p/>
<data:contactFormMessageMsg/> <span style='font-weight: bolder;'>*</span>
<br/>
<textarea class='contact-form-email-message' cols='25' expr:id='data:widget.instanceId + "_contact-form-email-message"' name='email-message' rows='5'/>
<p/>
<input class='contact-form-button contact-form-button-submit' expr:id='data:widget.instanceId + "_contact-form-submit"' expr:value='data:contactFormSendMsg' type='button'/>
<p/>
<div style='text-align: center; max-width: 222px; width: 100%'>
<p class='contact-form-error-message' expr:id='data:widget.instanceId + "_contact-form-error-message"'/>
<p class='contact-form-success-message' expr:id='data:widget.instanceId + "_contact-form-success-message"'/>
</div>
</form>
</div>
</div>
<b:include name='quickedit'/>
</b:includable>
</b:widget>
After you have saved the template, go to Pages and paste the following code into a new blank page with the title you want:
<div class='widget ContactForm' id='ContactForm1'>
<div class='contact-form-widget'>
<div class='form'>
<form name='contact-form'>
<p>Name<p>
<input class='contact-form-name' id='ContactForm1_contact-form-name' name='name' size='30' type='text' value=''/>
<p>E-mail *</p>
<input class='contact-form-email' id='ContactForm1_contact-form-email' name='email' size='30' type='text' value=''/>
<p>Message *</p>
<textarea class='contact-form-email-message' cols='25' id='ContactForm1_contact-form-email-message' name='email-message' rows='5'></textarea>
<input class='contact-form-button contact-form-button-submit' id='ContactForm1_contact-form-submit' type='button' value='Submit'/>
<p class='contact-form-error-message' id='ContactForm1_contact-form-error-message'></p>
<p class='contact-form-success-message' id='ContactForm1_contact-form-success-message'></p>
</form>
</div>
</div>
</div>
Messages will be sent to the same email that you have registered in Blogger.
Here's a demo page where you can test it (it is an account that I don't use, so don't expect reply).
That's it! If you have any questions or comments please post below.