Showing posts with label tipsntricks. Show all posts

Sunday, 3 November 2013

Idea 3G Trick November 2013 For All Over India (No Survey)


idea 3g udp trick october november working all over india with blazing speed


TrickUniversity is back with IDEA UDP November 3g Trick which is working all over india,this idea 3g udp trick is tested and working with blazing speed at 0 balance.so enjoy this trick before it gets blocked.


IDEA 3G UDP TRICK FEATURES:

as you know my previous posts like vodafone twitter trick and many other tricks are blocked in some states so this idea 3g trick is biggest alternative for us to enjoy 3g at free of cost.


FEATURES Of This Trick:

1)Maintain 1 rs balance or 0 balance 
2)based on udp protocol so no compromise in speeds
3)confirmed working in Maharashtra, rajasthan, Gujarat and Delhi
4)No balance deduction at all
5) No speed cap or sim block
6)Torrents supported


                                                    DOWNLOAD  

download trick from the link and apn and all details are provided in file and stout vpn is also added you can use that to enjoy this trick without any limits.so if you are using still proxies or traditional tcp tricks its better to try this idea 3g udp trick october november 2013.

thats all about idea 3g  trick november and dont forget to like us on facebook,enjoy tricks without survey inTrickuniveristy.me
Read more ...


Sunday, 27 October 2013

Laaptu Auto Guessing Script

Hello Readers, today we are back with new trick on Laaptu. Using this trick you easily earn free recharge from laaptu. Many of you might know what is laaptu, if you don't know here is a quick review on Laaptu.
Free Recharge On Laaptu

Review On Lapptu:

  • Laaptu is a free recharge providing website.
  • You get RS 2 as joining bonus.
  • You can invite your friend and earn RS 1 for it.
  • Minium recharge amount is RS 10.
  • It also provides another way to earn free recharge.
  • You can earn recharge by filling wallet, you just have to guess answer.
  • You get 2 paise for every guess you make.
  • You also get 1 paise daily just for visiting laaptu.
  • If you don't have laaptu account then join here.
So, are you ready for free recharge. Just Follow below steps.

Laaptu Auto Guessing Script:

  • We are providing you a script by which you have to do nothing.
  • Just go to laaptu, click on fill wallet.
  • Done! all answers will be guessed automatically.
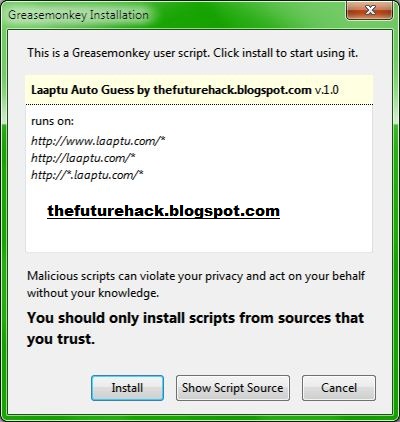
  • Download the script from here.
  • To run the script you need have Greasemonkey addon installed in Mozilla.
  • Download Greasemonkey here(if you don't have it)
Laaptu Auto Guessing Script

Be Social! Take a second share this post with your friends if it helped you.


Read more ...


Friday, 16 August 2013

How to Increase Internal Memory Of Android Phone

Link2SD is an android application by Bulent Akpinar that lets you move apps and games to the 2nd partition of your SD card. Why do we have to use Link2SD when Froyo and Gingerbread’s Native Apps2sd moves the files to the SD card? Native apps2sd only moves the apk file of the application leaving other files in internal memory thus you still have to manage your on-board memory and limit your choice of apps because it will eat up your memory and later on you cannot install any files anymore. Additionally, widgets and some applications are not intended to be moved to the SD card. However, Link2SD is only for root users because it is required that your phone is rooted.
Link2SD
The idea behind the application is the same. But Link2SD has more relevant features which the Native Apps2sd lacked giving Android 1.5 and up users the chance to have a taste of what it’s like to have a big phone memory. Additional features were added by the developer to furher optimize the usage of android devices. By using Link2SD, you can move not only the application file, but also  the dalvic-cache and libray files of the application. This means that data will be the only one left to consume your internal memory thus installing applications and games would be easier because you can install anything you want without worrying about the famous low memory problem. Furthermore, Link2sd covers all files even moving widgets and the unmoveable applications to the 2nd partition of your SD card.
This is a step by step guide on how you can run Link2SD on your device. This tutorial will work for both stock and cutom ROMs. For ClockWorkMod Recovery users, you can check the other guide below. Follow all the instructions carefully to eliminate possible problems.
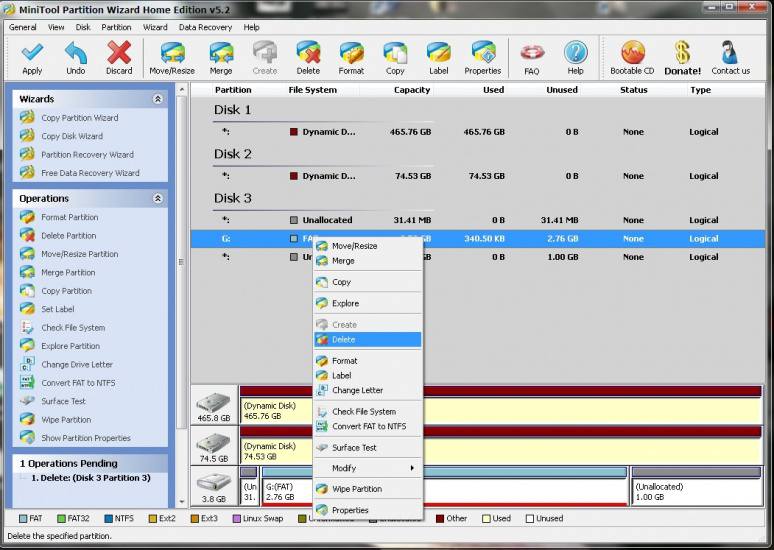
  1. First you have to download Mini Tool Partition Wizard Manager. You can download it HERE.
  2. Insert your SD card to a card reader and open it on your computer.
  3. Back up all your files to the computer because partitioning will wipe your data.
  4. Open Mini Tool in your computer. Locate your SD card (be careful in choosing and make sure not to choose the drive of your computer)
  5. Right click and choose Delete.link2sd 3
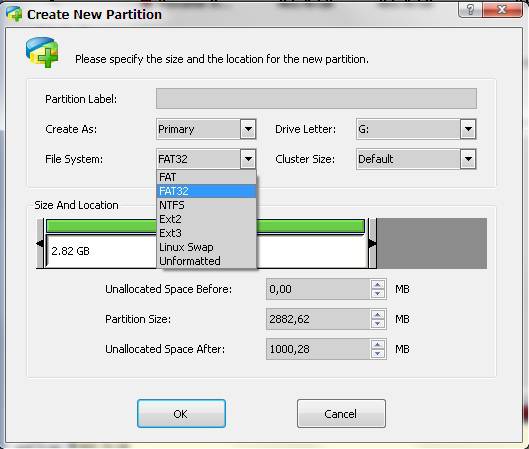
  6. Right click on it again and choose Create New. Create “FAT32″ partition (This is where all your media files will go. Be sure to make it bigger than the 2nd part)
  7. Select “Create as: PRIMARY” link2sd 4
  8. Next, create an ext2/ext3/ext4 partition (if you’re on stock ROM, choose ext2). This is where your apps will go. I suggest a value of 512Mb or 1Gb would be big enough but if you insist you can go as high as 2Gb.
  9. Select “Create As: PRIMARY” (make sure that it is both set to primary because it will not work if it is not set to primary) link2sd 5
  10. Click the “Apply” button on the top left corner and wait for it to finish the process. Done.
  11. Put back your SD card to your phone and switch it on.
  12. Download and install Link2sd from Google Play Store.
  13. Open Link2sd. You will be prompted to choose between ext2, ext3, ext4 and FAT32. Select ext2. link2sd 6
  14. It will say mount script created. Reboot your phone now.
  15. Open link2sd and if the message doesn’t show up, you succeded.
  16. Go to Link2sd>Settings>check the autolink (to automatically move apps upon installation)
  17. If you already have some apps, select “move to phone” then after moving select “Create Link” (be sure to check the three files: app, dalvic-cache and library files)
  18. link2sd 2link2sd
  19. To check your memory, select “Storage Info”. This will show you the current state of your internal memory, FAT32, and ext2 partition.                                                                                            link2sd 7
  20. Now you’re done and ready to install vast amount of applications as you wish!
FOR CLOCKWORKMOD RECOVERY USERS ONLY( ALTERNATIVE METHOD)
NOTE: You can also use the instructions above. This guide will work on both stock and custom ROMs.
  1. Back up all your files to your computer. Partitioning wipes the files of your SD card.
  2. Go into recovery mode
  3. Select “Advanced”
  4. Select “Partition SD card”
  5. Choose your SD-ext size (if you’re using a 2Gb SD card, choose 512Mb. If your SD card is 4Gb or greater, you can choose 1024Mb)
  6. Select 0 swap
  7. Wait for the process to finish. Reboot.
  8. Download and install Link2SD from Google Play Store.
  9. Open Link2SD you will be prompted to choose between ext2, ext3, ext4 or FAT32. Choose ext4.
  10. Follow instructions number 14-20. DONE!
Having troubles? Feel free to comment and post your questions below. Enjoy! :)
- See more at: http://www.noypigeeks.com/android/tutorial-a-guide-to-link2sd/#sthash.7AcT9NOr.dpuf
Read more ...


Thursday, 15 August 2013

Install Windows 7 or Windows 8 from USB

This guide works 100% for Windows 7 and Windows 8 unlike most of the guides out there. I have seen many sites/blogs that have “Install Vista from USB guide” but either with incomplete steps or not working guide. I have also seen some guides that don’t’ use proper commands in this guide. After spending many hours I have come up with this 100% working guide to install Windows 7 and Windows 8 from USB flash drive.
I just did this method on one of my friends machine and installed Windows 7 and Windows 8 . The main advantage is that by using USB drive you will be able to install Windows 7 or Windows 8 in just 15 minutes. You can also use this bootable USB drive on friend’s computer who doesn’t have a DVD optical drive.
The method is very simple and you can use without any hassles. Needless to say that your motherboard should support USB Boot feature to make use of the bootable USB drive.
Requirements:
*USB Flash Drive (Minimum 4GB)
*Windows 7 or Windows 8 installation files.
Follow the below steps to create bootable Windows 7/Windows 8 USB drive using which you can install Windows 7 or Windows 8 easily.
Procedure:
1. Plug-in your USB flash drive to USB port and move all the contents from USB drive to a safe location on your system.
2. Open Command Prompt with admin rights. Use any of the below methods to open Command Prompt with admin rights.
*Type cmd in Start menu search box and hit CtrlShiftEnter.
Or
*Go to Start menu > All programs > Accessories, right click on Command Prompt and select Run as administrator.
3. You need to know about the USB drive a little bit. Type in the following commands in the command prompt:
First type DISKPART and hit enter to see the below message.
Bootable USB Drive

Next type LIST DISK command and note down the Disk number (ex: Disk 1) of your USB flash drive. In the below screenshot my Flash Drive Disk no is Disk 1.
4. Next type all the below commands one by one. Here I assume that your disk drive no is “Disk 1”.If you have Disk 2 as your USB flash drive then use Disk 2.Refer the above step to confirm it.
So below are the commands you need to type and execute one by one:
SELECT DISK 1
CLEAN
CREATE PARTITION PRIMARY
SELECT PARTITION 1
ACTIVE
FORMAT FS=NTFS
(Format process may take few seconds)
ASSIGN
EXIT
Don’t close the command prompt as we need to execute one more command at the next step. Just minimize it.
Bootable USB Drive

5. Next insert your Windows7/Windows 8 DVD into the optical drive and check the drive letter of the DVD drive. In this guide I will assume that your DVD drive letter is “D” and USB drive letter is “H” (open my computer to know about it).
6. Maximize the minimized Command Prompt in the 4th step.Type the following command now:
D: CD BOOT and hit enter.Where “D” is your DVD drive letter.
CD BOOT and hit enter to see the below message.
7. Type another command given below to update the USB drive with BOOTMGR compatible code.
BOOTSECT.EXE /NT60 H:
14

Where “H” is your USB drive letter. Once you enter the above command you will see the below message.
8. Copy your Windows 7 or Windows 8 DVD contents to the USB flash drive.
9. Your USB drive is ready to boot and install Windows 7 or Windows 8. Only thing you need to change the boot priority at the BIOS to USB from the HDD or CD ROM drive. I won’t explain it as it’s just the matter the changing the boot priority or enabling the USB boot option in the BIOS.
Note: If you are not able to boot after following this guide means you haven’t set the BIOS priority to USB. If you got any problem in following this guide feel free to ask questions by leaving comment.

This guide works 100% for Windows 8 as well. Make sure you follow all steps correctly and launch the Command Prompt with admin rights (as given in the guide) to avoid errors. Good luck!
Read more ...


Friday, 2 August 2013

Windows 8 Activator [Guarantee Activation]

Windows 8 is the most popular operating system ever made by microsoft.Since it i is the most user friendly operating system,Billions of people use it.But it costs around 40$ for activation.Today we are providing a top class  windows activator that activates windows 8 all version easily for free.

HOW TO INSTALL:

  1. RUN AS ADMINISTRATOR [right click on the .exe - click on Run As ...]
  2. CLICK ON INSTALL / UNINSTALL WINDOWS 8 - When command Prompt Opens and Askes to PRESS Y / N 
  3. JUST PRESS Y AND THAT'S ALL IT WILL BE ACTIVATED IT BY ITSELF( IT SHOULD SAY ACTIVATION SUCCESSFUL 
  4. PRESS OK AND OK AGAIN, AND THEN ON COMMAND PROMPT IT WILL SAY THAT IT WILL RESTART - so LET IT RESTART BY ITSELF
  5. IT WILL THEN RESTART AND Voila ACTIVATED. 
 I Also Thinks it Works With All Version of Windows 8 but has not yet tested except for PRO version which prove that it works.
    It also work on RTM VERSION of Windows 8 and with W.Z.T Release.
Read more ...


MS Office Activator [No Survey]

Here is the Office 2013 Activator for you adore activating your office 2013 Activates VL version:
with the activator and accomplish it a abounding adaptation and this activator helps you a lot to actuate your office which has abounding avant-garde appearance than afore versions and its busline appearance is additionally an amazing affection in office 2013 and if you like to accept this aloof download it here

KMSpico v8.1 - is the ideal tool to activate the final version of Windows 7/8 and Office 2010/2013. Actuator does not require user intervention, the entire activation process takes place in the background, just run the activator and a couple of minutes to check the activation status of Windows and / or Office.

Features:
• Universal (Activates Windows Vista/7/8 Pro/(8.1 Preview)/Enterprise/N/VL and Office 2010/2013 Retail/VL.)
• Does not require user intervention (enough to run the activator).
• Simultaneous activation immediately and Windows, and Office.

With KMSpico can:
• Activate Windows 8.1 Preview
• Activate Windows 8 Enterprise
• Activate Windows 8 Professional
• Activate Microsoft Office 2013
• Activate Microsoft Office Visio 2013
• Activate Microsoft Office Project 2013
• Activate Microsoft Office 2010
• Activate Microsoft Office Visio 2010
• Activate Microsoft Office Project 2010
• Activate Windows 7 Enterprise
• Activate Windows 7 Professional
• Activate Windows Vista Enterprise
• Activate Windows Vista Professional
• Microsoft Windows Server 2012


nstruction:
1. Run KMSpico.exe or RunTrigger.cmd
2. Done..

Based off of Microsoft Toolkit - Official KMS Solution for Microsoft Products 2.4.3.

How This Program Works:
1. Install KMSpico v8.1 in Windows.
2. Run automatically KMSELDI and AutoPico.
2.1 Make Tokens Backup.
2.2 Detect VL or Retail and depending of the License Status activate or convert to VL.
2.3 Activate for 180 days all VL products found.
3. Install a windows service that reactive every windows start.
4. Create a task schedule for AutoPico to run every 24 hours.

Change Log  in KMSpico v8.1 :
  • Fixed known logical bugs.
  • Fixed bugs with faster processors.
Recommendations:
  • Disable Microsoft Security Updates.
  • Make exceptions to Directory %ProgramFiles%\KMSpico in Antivirus.

Download KMSpico v8.1 for Offline Office 2013 Here:


Read more ...


Sunday, 28 July 2013

Buy Domain and Hosting Without Credit Card

Purchasing Domain names in India is actual adamant if you don’t accept acclaim card. If you don’t accept acclaim agenda it agency you don’t accept absolute Paypal annual and appropriately you can’t acquirement application Paypal too.


How to Purchase Domain Online using Debit Card in India?

If you don’t accept acclaim agenda again you can use your bounded coffer debit agenda to acquirement area or Hosting online.
Its simple, You can use  BigRock.in to acquirement bargain domains in India (You can acquirement .in area @99rs – Offer asleep now) Bigrock.in accepts all types of Credit Card / Debit cards/ Net banking/


How to Purchase Domain without Credit/Debit Card?

Actually before 2 year ago, I didn’t accept Acclaim agenda & Debit Agenda & was active a actual aerial cartage blog at blogspot chargeless blogging service. Then i get to apperceive its actual adamantine to bodies like me to account acclaim or debit card. But now i accept both cc/dc and appropriately i appetite to advice Indians like me, so you can get area after accepting cc/bc through emailing me


Incoming search terms:

buy domain and email in just 99 in india
buy domain with credit card
buy from usa to india without creditcard
getting a web domain without a credit card in japan
how to purchase a domain name in india without using creditcard
I dont have a Credit Card how can I purchase a Domain Name thru blogger
which bank is best for buy hosting domains in india

Read more ...


Wednesday, 17 July 2013

How To Optimize Your Robot Header Tag in Blogger

Many Of Us are Using Blogger Platform Because it is free, Having Inbuilt Feature, Easy to Use and Most Important it is having grace of Google but There is One Drawback You Can't Do Search Engine Optimization in it. Do You think So ? If You Think So then you should Update Your Knowledge because this post is On " How to Optimize Your Blogger's Robot Header Tag".


What is Robot Header Tag ?

Robot Header Tag is the Custom Setting which Tells the Search Engine about the Indexing Post. I Mean to Say it tells Search Engine which Post or Page should be index and which should be Skipped. Robot Header Tag Customization is very Sensitive and done with Care because this Setting Can Make Your Blog King or Just a Servant.

For Ease Of Use Of this Amazing Tool Of Blogger I Here Giving You the Basic Customization Example.


Steps to Optimize Robot Header Tag

#1 :- Login Into Your Blogger Dashboard.

#2:- Now Go to the Selected Blog's Setting -> Search Preference then You'll See an Block Titled Crawling        as Shown below.

#3 :- Click On Edit and Fill the Below Setting

#4 : After completing the above step click on save changes.You are all done! :)

Please We Request You If You're Not Sure with Your Setting Please Fill Our Given Setting It will Do Much Better Work For You.

Last Word!!! Please Comment On Our Blog & Revisit For More Tricks
Read more ...


Tuesday, 16 July 2013

How to Get Google Adsense Approval Within 2-3 Hours

Google Adsense Approval !!! Off WTF Google adsense approval is Becoming a Big Challenge For Every Blogger these Days Because of the Rules Of Google Adsense it is So Much Typical and Complex. But Now Trick University is Going to Tell You the Trick Which will Give You an Adsense Account Approval within 1-2 Hours Depending Upon Your Geographical Detail.

Google Adsense Account Approval


What You Need ?

  • A Fresh New Gmail Account which was Never Submitted for Google Adsense.
  • YouTube Account Of Same Gmail Account
  • Fresh Detail On Gmail & YouTube Account

Procedure :-

  • Firstly, Go to YouTube and set an Account Over there
  • Then Go to Video Manager -> Channel Setting then Go to Monetization Tab and then Click On Enable Your Account
  • After Accepting  Term & Condition Go to Video Manager then again to Monetization tab.
  • After Getting into It, You'll see Question Series Just Find the Question "How will I Get Paid" and Click On Associate Adsense Account.
  • Then You'll Have to Login into your Gmail Account and Click on Continue. Then You'll See another Page Without Changing anything Just Click Continue.
  • Now the Last but Not the Least Submit Your Personal Detail and Submit Your Detail.If All Goes Alright in 1-3 Hours You'll Get an Approval Letter.

After Getting Approval Letter Please Comment Here With Your Screenshot
Read more ...


Wednesday, 10 July 2013

How to Add Ribbon On Admin Comment

Admin !!! This Simple Word Have a Big Responsibility in it. If a Blog, a Website get any Achievement then that is also because Of Admin then Why We Have Same Pattern Or Same Style While We Comment In Our Blog. I am On the Way to Writing a Blog Post On "How to Make a Blogger Theme" but Suddenly My Facebook Friend asked Me a Question that how can we Add Ribbon For Admin Comment so, I thought that First I Should Write On this Then I'll Go to My Decided Article.


Steps to Add Ribbon :-


  1. Go to Blogger Dashboard -> Your Blog -> Templates -> Edit HTML
  2. Then Through Ctrl+F Find "</b:skin>
  3. Then Search For Comment Between </b:skin> & [[</b:skin>
  4. You'll See Some Code Similar to the Below Code (Don't Worry If There Is Slight Change) :-

    #comments .comment-author{
    padding-top: 1.5em;
    border-top: 1px solid $(body.rule.color);
    background-position: 0 1.5em;
    }
    #comments .comment-author:first-child{
    padding-top: 0;
    border-top: none;
    }
    .comments .comment-content{ padding:5px 0;
    }
    .avatar-image-container{
    margin: .2em 0 0;
    }
    #comments .avatar-image-container img{
    border: 1px solid $(image.border.color);
    }
    .comment-actions a
    {
    font-size:11px; color:#777 !important
    }
    .comments .comments-content .user
    {
    font-size:16px; color:#000;
    }
    .comments .comments-content .datetime
    {
    font-size:11px; color:#777 !important
    }
    .comments .comments-content .datetime a
    {
    color:#777;
    }
    .comments .comments-content .comment-thread ol a
    {
    color:#000;}

    .comments .comments-content .loadmore a{
    border-top: 1px solid $(widget.alternate.text.color);
    border-bottom: 1px solid $(widget.alternate.text.color);
    }
    .comments .comment-block
    {
    border: 1px solid #ddd;
    padding: 7px;
    }
    .comments .comment-thread.inline-thread{
    background-color: $(post.footer.background.color);
    }
    .comments .continue a
    {
    background:#f9f9f9;width:130px;border:1px solid #ddd;border-radius:9px;
    padding: 10px;color:#000;
    }
    .comments .continue{
    border-top: 2px solid $(widget.alternate.text.color);
    }
    .comments h4{
    font: $(post.title.font);
    margin: .75em 0 0;
    padding: 10px;
    border: 1px solid #ddd;
    width: 100px;
    }
    .comment-form
    {
    width:90%;
    max-width:90%
    }
  5. As You Can See the Yellow Highlighted Code Find that in Your Blog and Just above it Place the Below Code :-.comments .comments-content .icon.blog-author
    {
    background-repeat: no-repeat;
    background-image: url (Your Ribbon Or Icon Image Link Goes Here);
    height:38px;
    width:38px;margin:0;
    position:absolute;
    right:0px;
    top:-0px;
    }
  6. Now, You are Done....

Wow Vivek!!! But After Coding this Can We Change the Image ?
Yes Ofcourse!!! the Green Area which You are seeing above is Only For that just replace the image link and Your Icon will Be Changed...

Be Open To Share Your Problem & Views Here
Read more ...


Poll